14.Spring 应用上下文 ApplicationContext
14.Spring 应用上下文 ApplicationContext
该系列文章是本人在学习 Spring 的过程中总结下来的,里面涉及到相关源码,可能对读者不太友好,请结合我的源码注释 Spring 源码分析 GitHub 地址 进行阅读
Spring 版本:5.1.14.RELEASE
开始阅读这一系列文章之前,建议先查看《深入了解 Spring IoC(面试题)》这一篇文章
该系列其他文章请查看:《死磕 Spring 之 IoC 篇 - 文章导读》
Spring 应用上下文 ApplicationContext
前面一系列文章都是围绕 BeanFactory 进行分析的,BeanFactory 是 Spring 底层 IoC 容器的实现,完成了 IoC 容器的基本功能。在实际的应用场景中,BeanFactory 容器有点简单,它并不适用于生产环境,我们通常会选择 ApplicationContext。ApplicationContext 就是大名鼎鼎的 Spring 应用上下文,它不仅继承了 BeanFactory 体系,还提供更加高级的功能,更加适用于我们的正式应用环境。如以下几个功能:
- 继承 MessageSource,提供国际化的标准访问策略
- 继承 ApplicationEventPublisher ,提供强大的事件机制
- 扩展 ResourceLoader,可以用来加载多个 Resource,可以灵活访问不同的资源
- 对 Web 应用的支持
ApplicationContext 体系结构
先来看看 ApplicationContext 接口的继承关系
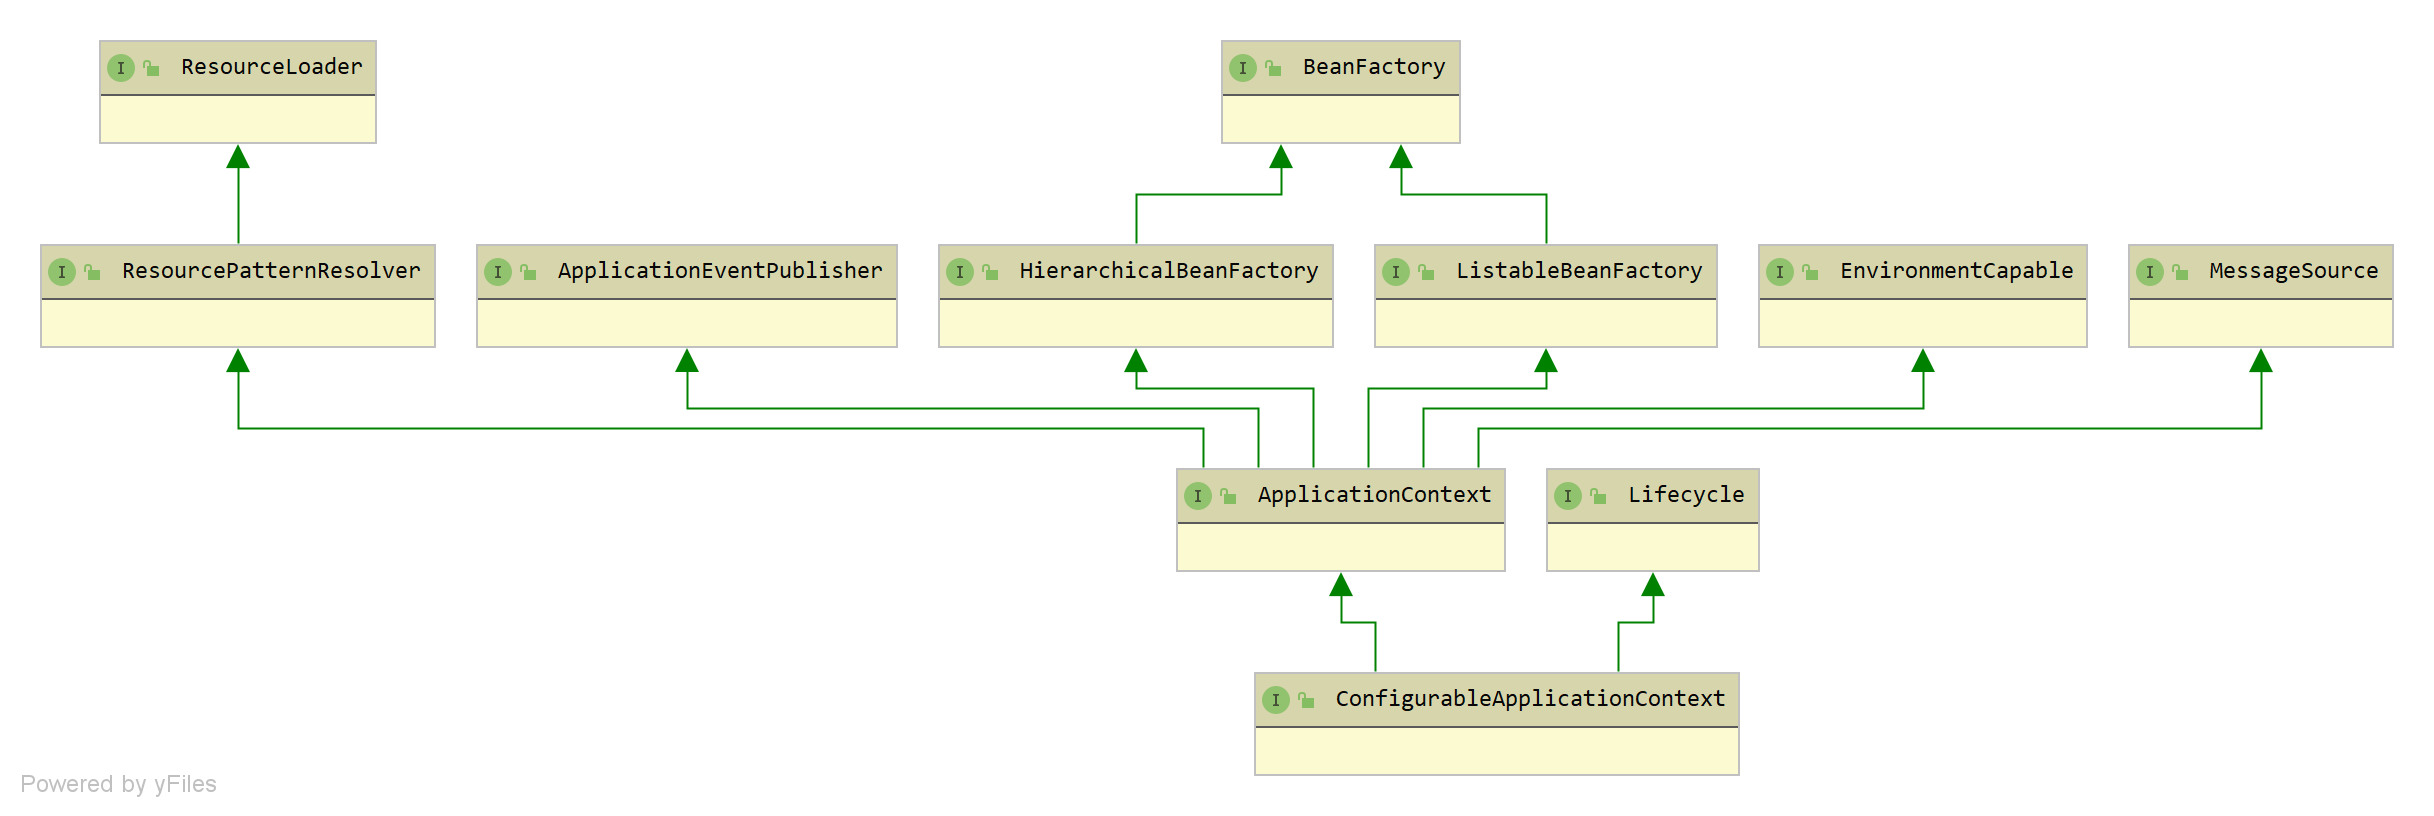
可以看到 ApplicationContext 除了继承 BeanFactory 接口以外,还继承了 MessageSource、ApplicationEventPublisher、ResourceLoader 等接口
简单描述几个接口:
- org.springframework.core.io.ResourceLoader,资源加载接口,用于访问不同的资源
- org.springframework.context.ApplicationEventPublisher,事件发布器接口,支持发布事件
- org.springframework.context.MessageSource,消息资源接口,提供国际化的标准访问策略
- org.springframework.core.env.EnvironmentCapable,环境暴露接口,Spring 应用上下文支持多环境的配置
- org.springframework.context.ApplicationContext,Spring 应用上下文,仅可读
- org.springframework.context.ConfigurableApplicationContext,Spring 应用上下文,支持配置相关属性
接下来我们来看看它们的实现类的继承关系(部分)
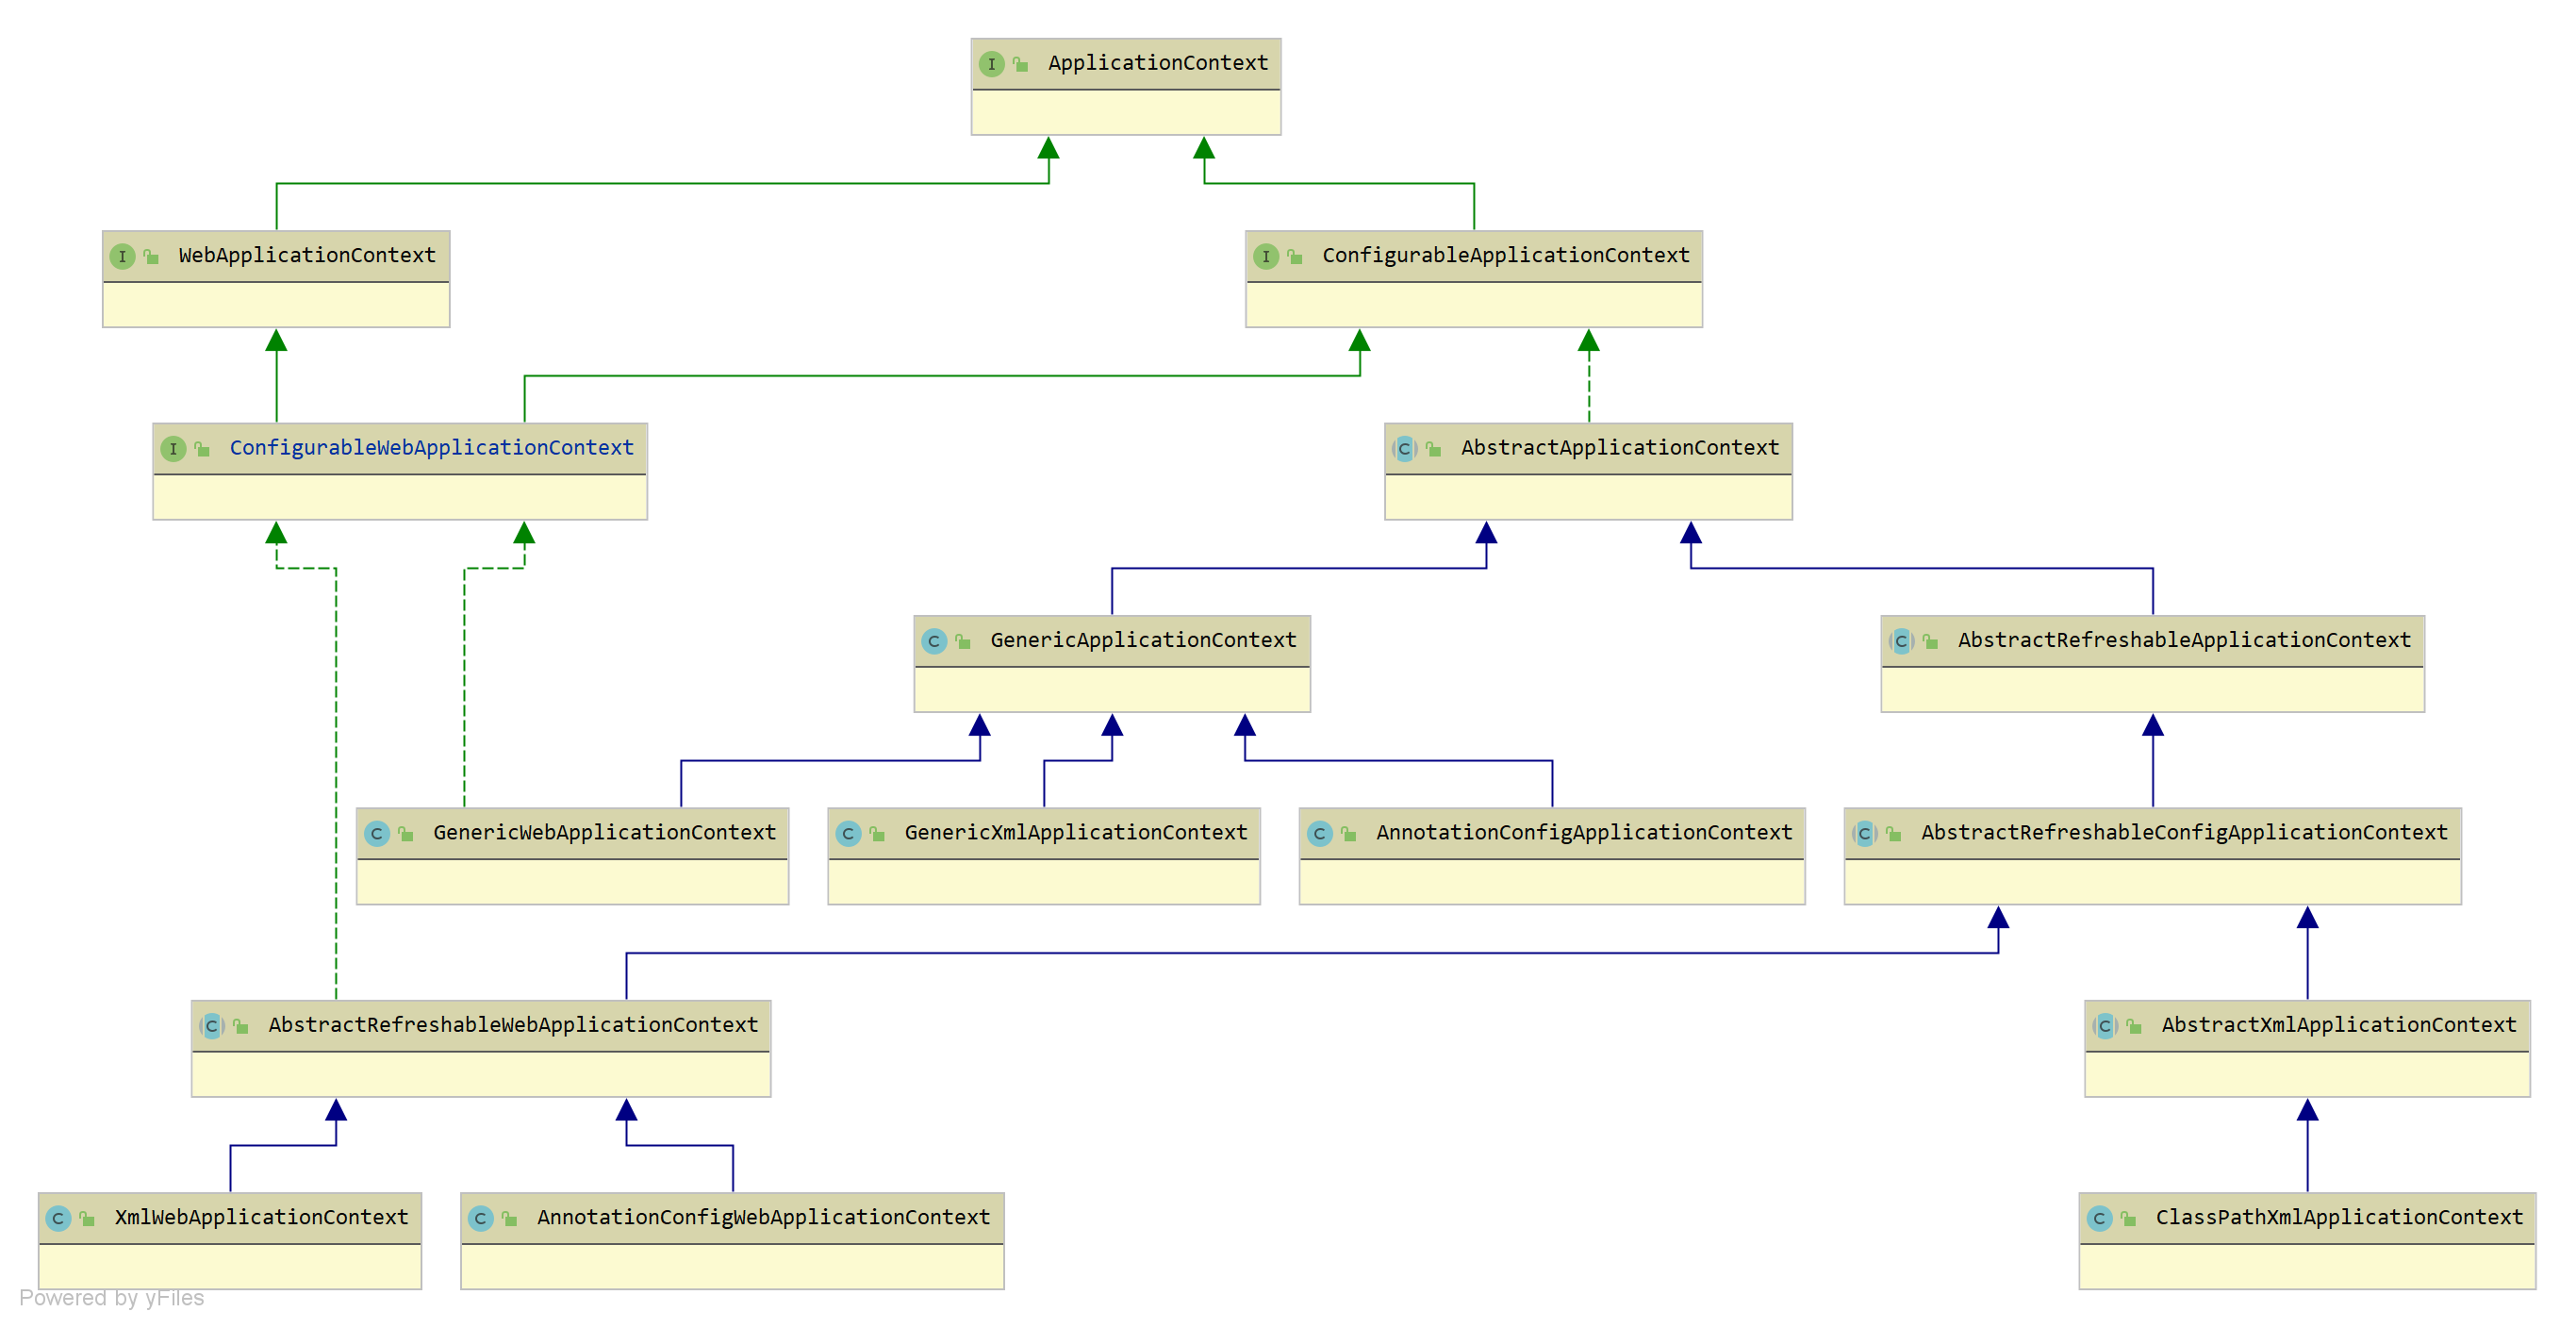
简单描述上面几个关键的类:
- org.springframework.context.support.AbstractApplicationContext,Spring 应用上下文的抽象类,实现了大部分功能,提供骨架方法交由子类去实现
- org.springframework.web.context.ConfigurableWebApplicationContext,可配置的 Spring 应用上下文接口,支持 Web 应用
- org.springframework.context.support.AbstractRefreshableConfigApplicationContext,支持设置 XML 文件
- org.springframework.web.context.support.AbstractRefreshableWebApplicationContext,支持 Web 应用
- org.springframework.web.context.support.AnnotationConfigWebApplicationContext,支持 Web 应用,可以设置 XML 文件,并可以扫描注解下面的 Bean
- org.springframework.context.annotation.AnnotationConfigApplicationContext,支持扫描注解下面的 Bean
- org.springframework.web.context.support.ClassPathXmlApplicationContext,支持设置 XML 文件,也可以从 classpath 下面扫描相关资源
ApplicationContext 的子类比较多,主要根据支持 Web、支持注解、支持 XML 文件三个功能进行区分,我们大致了解每个实现类的作用即可。其中基本的实现都是在 AbstractApplicationContext 这个抽象类中完成的,在它的 refresh() 方法体现了 Spring 应用上下文的生命周期。AbstractApplicationContext#refresh() 这个方法可以说是 Spring 应用上下文的准备阶段,在使用 Spring 时该方法会被调用,本文就围绕它进行展述。
可以先看到我的另一篇文章《死磕Spring MVC源码分析 - WebApplicationContext 容器的初始化》,在 Spring MVC 启动过程中,创建 Spring 应用上下文后会调用其 refresh() 方法进行刷新,让 Spring 应用上下文准备就绪。
AbstractApplicationContext
org.springframework.context.support.AbstractApplicationContext,Spring 应用上下文的抽象类,实现了大部分功能,提供骨架方法交由子类去实现
先来看看它的相关属性
public abstract class AbstractApplicationContext extends DefaultResourceLoader
		implements ConfigurableApplicationContext {

	public static final String MESSAGE_SOURCE_BEAN_NAME = "messageSource";

	public static final String LIFECYCLE_PROCESSOR_BEAN_NAME = "lifecycleProcessor";

	public static final String APPLICATION_EVENT_MULTICASTER_BEAN_NAME = "applicationEventMulticaster";

	static {
		// Eagerly load the ContextClosedEvent class to avoid weird classloader issues
		// on application shutdown in WebLogic 8.1. (Reported by Dustin Woods.)
		ContextClosedEvent.class.getName();
	}

	/** Unique id for this context, if any. */
	private String id = ObjectUtils.identityToString(this);

	/** Display name. */
	private String displayName = ObjectUtils.identityToString(this);

	/** 父应用上下文 */
	@Nullable
	private ApplicationContext parent;

	/** 当前应用上下文的环境 */
	@Nullable
	private ConfigurableEnvironment environment;

	/** BeanFactory 的处理器 */
	private final List<BeanFactoryPostProcessor> beanFactoryPostProcessors = new ArrayList<>();

	/** 启动时间 */
	private long startupDate;

	/** 是否处于激活状态 */
	private final AtomicBoolean active = new AtomicBoolean();

	/** 是否处于关闭状态 */
	private final AtomicBoolean closed = new AtomicBoolean();

	/** 启动和销毁时的锁对象 */
	private final Object startupShutdownMonitor = new Object();

	/** 钩子函数,用于 JVM 关闭时的回调 */
	@Nullable
	private Thread shutdownHook;

	/** ResourcePatternResolver used by this context. */
	private ResourcePatternResolver resourcePatternResolver;

	/** LifecycleProcessor for managing the lifecycle of beans within this context. */
	@Nullable
	private LifecycleProcessor lifecycleProcessor;

	/** MessageSource we delegate our implementation of this interface to. */
	@Nullable
	private MessageSource messageSource;

	/** 事件广播器 */
	@Nullable
	private ApplicationEventMulticaster applicationEventMulticaster;

	/** 事件监听器 */
	private final Set<ApplicationListener<?>> applicationListeners = new LinkedHashSet<>();

	/** 早期(Spring 应用上下文还未就绪)注册的时间监听器 */
	@Nullable
	private Set<ApplicationListener<?>> earlyApplicationListeners;

	/** 早期(Spring 应用上下文还未就绪)发布的事件 */
	@Nullable
	private Set<ApplicationEvent> earlyApplicationEvents;

	public AbstractApplicationContext() {
		this.resourcePatternResolver = getResourcePatternResolver();
	}

	public AbstractApplicationContext(@Nullable ApplicationContext parent) {
		this();
		setParent(parent);
	}
}
属性不多,上面都有注释
publishEvent 方法
publishEvent(ApplicationEvent event) 方法,发布事件,因为它继承了 ApplicationEventPublisher 事件发布器,如下:
@Override
public void publishEvent(ApplicationEvent event) {
    publishEvent(event, null);
}

protected void publishEvent(Object event, @Nullable ResolvableType eventType) {
    Assert.notNull(event, "Event must not be null");

    // Decorate event as an ApplicationEvent if necessary
    ApplicationEvent applicationEvent;
    if (event instanceof ApplicationEvent) {
        applicationEvent = (ApplicationEvent) event;
    }
    else {
        // 如果不是 ApplicationEvent 类型的事件,则封装成 PayloadApplicationEvent
        applicationEvent = new PayloadApplicationEvent<>(this, event);
        if (eventType == null) {
            eventType = ((PayloadApplicationEvent<?>) applicationEvent).getResolvableType();
        }
    }

    // Multicast right now if possible - or lazily once the multicaster is initialized
    if (this.earlyApplicationEvents != null) {
        this.earlyApplicationEvents.add(applicationEvent);
    }
    else {
        // 广播该事件
        getApplicationEventMulticaster().multicastEvent(applicationEvent, eventType);
    }

    // Publish event via parent context as well...
    // 父容器也要发布事件
    if (this.parent != null) {
        if (this.parent instanceof AbstractApplicationContext) {
            ((AbstractApplicationContext) this.parent).publishEvent(event, eventType);
        }
        else {
            this.parent.publishEvent(event);
        }
    }
}
过程如下:
1、 如果不是ApplicationEvent类型的事件,则封装成PayloadApplicationEvent;
2、 如果earlyApplicationEvents不为null,则表示当前Spring应用上下文正在处于刷新阶段,还没有准备就绪,则先将这个早期事件添加至earlyApplicationEvents;否则,Spring应用上下文已经准备就绪了,此时就对该事件进行广播;
3、 如果存在父应用上下文,也需要进行广播;
上面的第 2 步中的 earlyApplicationEvents 如果不为 null ,为什么 Spring 应用上下文还没有准备就绪呢?答案会在后面体现
addBeanFactoryPostProcessor 方法
addBeanFactoryPostProcessor(BeanFactoryPostProcessor postProcessor) 方法,添加 BeanFactoryPostProcessor 处理器,如下:
@Override
public void addBeanFactoryPostProcessor(BeanFactoryPostProcessor postProcessor) {
    Assert.notNull(postProcessor, "BeanFactoryPostProcessor must not be null");
    this.beanFactoryPostProcessors.add(postProcessor);
}
直接往beanFactoryPostProcessors 添加,BeanFactoryPostProcessor 处理器用于在 Spring 应用上下文刷新阶段对创建好的 BeanFactory 进行后缀处理
addApplicationListener 方法
addApplicationListener(ApplicationListener<?> listener) 方法,添加事件监听器,如下:
@Override
public void addApplicationListener(ApplicationListener<?> listener) {
    Assert.notNull(listener, "ApplicationListener must not be null");
    if (this.applicationEventMulticaster != null) {
        this.applicationEventMulticaster.addApplicationListener(listener);
    }
    this.applicationListeners.add(listener);
}
如果事件广播器不为空则将该监听器添加进去,然后再添加到本地的 applicationListeners 中
【核心】refresh 方法
refresh() 方法,Spring 应用上下文的刷新,让 Spring 应用上下文处于准备就绪状态,如下:
/**
 * 刷新上下文,在哪会被调用?
 * 在 **Spring MVC** 中,{@link org.springframework.web.context.ContextLoader#initWebApplicationContext} 方法初始化上下文时,会调用该方法
 */
@Override
public void refresh() throws BeansException, IllegalStateException {
    // <1> 来个锁,不然 refresh() 还没结束,你又来个启动或销毁容器的操作,那不就乱套了嘛
    synchronized (this.startupShutdownMonitor) {

        // <2> 刷新上下文环境的准备工作,记录下容器的启动时间、标记'已启动'状态、对上下文环境属性进行校验
        prepareRefresh();

        // `<3>` 创建并初始化一个 BeanFactory 对象 beanFactory,会加载出对应的 BeanDefinition 元信息们
        ConfigurableListableBeanFactory beanFactory = obtainFreshBeanFactory();

        // `<4>` 为 beanFactory 进行一些准备工作,例如添加几个 BeanPostProcessor,手动注册几个特殊的 Bean
        prepareBeanFactory(beanFactory);

        try {
            // `<5>` 对 beanFactory 在进行一些后期的加工,交由子类进行扩展
            postProcessBeanFactory(beanFactory);

            // <6> 执行 BeanFactoryPostProcessor 处理器,包含 BeanDefinitionRegistryPostProcessor 处理器
            invokeBeanFactoryPostProcessors(beanFactory);

            // <7> 对 BeanPostProcessor 处理器进行初始化,并添加至 BeanFactory 中
            registerBeanPostProcessors(beanFactory);

            // <8> 设置上下文的 MessageSource 对象
            initMessageSource();

            // <9> 设置上下文的 ApplicationEventMulticaster 对象,上下文事件广播器
            initApplicationEventMulticaster();

            // <10> 刷新上下文时再进行一些初始化工作,交由子类进行扩展
            onRefresh();

            // `<11>` 将所有 ApplicationListener 监听器添加至 applicationEventMulticaster 事件广播器,如果已有事件则进行广播
            registerListeners();

            // <12> 设置 ConversionService 类型转换器,**初始化**所有还未初始化的 Bean(不是抽象、单例模式、不是懒加载方式)
            finishBeanFactoryInitialization(beanFactory);

            // <13> 刷新上下文的最后一步工作,会发布 ContextRefreshedEvent 上下文完成刷新事件
            finishRefresh();
        }
        // <14> 如果上面过程出现 BeansException 异常
        catch (BeansException ex) {
            if (logger.isWarnEnabled()) {
                logger.warn("Exception encountered during context initialization - " +
                        "cancelling refresh attempt: " + ex);
            }
            // <14.1> “销毁” 已注册的单例 Bean
            destroyBeans();

            // `<14.2>` 设置上下文的 active 状态为 false
            cancelRefresh(ex);

            // <14.3> 抛出异常
            throw ex;
        }
        // `<15>` finally 代码块
        finally {
            // Reset common introspection caches in Spring's core, since we
            // might not ever need metadata for singleton beans anymore...
            // 清除相关缓存,例如通过反射机制缓存的 Method 和 Field 对象,缓存的注解元数据,缓存的泛型类型对象,缓存的类加载器
            resetCommonCaches();
        }
    }
}
整个过程比较长,每一个步骤都调用一个方法,过程如下:
1、 来个锁,不然refresh()还没结束,你又来个启动或销毁容器的操作,那不就乱套了嘛;
2、 应用上下文启动准备阶段,调用prepareRefresh()方法,说明:刷新上下文环境的准备工作,记录下容器的启动时间、标记'已启动'状态、对上下文环境属性进行校验;
3、 BeanFactory创建阶段,调用obtainFreshBeanFactory()方法,说明:创建并初始化一个BeanFactory对象beanFactory,会加载出对应的BeanDefinition元信息们;
4、 BeanFactory准备阶段,调用prepareBeanFactory()方法,说明:为beanFactory进行一些准备工作,例如添加几个BeanPostProcessor,手动注册几个特殊的Bean;
5、 BeanFactory后置处理阶段,调用postProcessBeanFactory(ConfigurableListableBeanFactory)方法,说明:对beanFactory在进行一些后期的加工,交由子类进行扩展;
6、 BeanFactory后置处理阶段,调用invokeBeanFactoryPostProcessors(ConfigurableListableBeanFactory)方法,说明:执行BeanFactoryPostProcessor处理器,包含BeanDefinitionRegistryPostProcessor处理器;
7、 BeanFactory注册BeanPostProcessor阶段,调用registerBeanPostProcessors(ConfigurableListableBeanFactory)方法,说明:对BeanPostProcessor处理器进行初始化,并添加至BeanFactory中;
8、 初始化内建Bean:MessageSource,调用initMessageSource()方法,说明:设置上下文的MessageSource对象;
9、 初始化内建Bean:Spring事件广播器,调用initApplicationEventMulticaster()方法,说明:设置上下文的ApplicationEventMulticaster对象,上下文事件广播器;
10、 Spring应用上下文刷新扩展阶段,调用onRefresh()方法,说明:刷新上下文时再进行一些初始化工作,交由子类进行扩展;
11、 Spring事件监听器注册阶段,调用registerListeners()方法,说明:将所有ApplicationListener监听器添加至applicationEventMulticaster事件广播器,如果已有事件则进行广播;
12、 BeanFactory初始化完成阶段,调用finishBeanFactoryInitialization(ConfigurableListableBeanFactory)方法,说明:设置ConversionService类型转换器,初始化所有还未初始化的Bean(不是抽象、单例模式、不是懒加载方式);
13、 应用上下文刷新完成阶段,调用finishRefresh()方法,说明:刷新上下文的最后一步工作,会发布ContextRefreshedEvent上下文完成刷新事件;
14、 如果上面过程出现BeansException异常;
1、 “销毁”已注册的单例Bean;
2、 设置上下文的active状态为false;
3、 抛出异常;
15、 finally代码块,清除相关缓存,例如通过反射机制缓存的Method和Field对象,缓存的注解元数据,缓存的泛型类型对象,缓存的类加载器;
可以看到该过程分为许多阶段,每个阶段都非常关键,将在后续已经进行分析
registerShutdownHook 方法
registerShutdownHook() 方法,向 JVM 注册一个钩子函数,当 JVM 关闭时执行该函数,如下:
@Override
public void registerShutdownHook() {
    if (this.shutdownHook == null) {
        // No shutdown hook registered yet.
        this.shutdownHook = new Thread() {
            @Override
            public void run() {
                synchronized (startupShutdownMonitor) {
                    doClose();
                }
            }
        };
        // 为当前的 JVM 运行环境添加一个钩子函数,用于关闭当前上下文
        Runtime.getRuntime().addShutdownHook(this.shutdownHook);
    }
}
这个钩子函数也就是调用了 doClose() 方法,用于关闭当前 Spring 应用上下文
close 方法
close() 方法,关闭当前 Spring 应用上下文,如下:
@Override
public void close() {
   synchronized (this.startupShutdownMonitor) {
      doClose();
      // If we registered a JVM shutdown hook, we don't need it anymore now:
      // We've already explicitly closed the context.
      if (this.shutdownHook != null) {
         try {
            Runtime.getRuntime().removeShutdownHook(this.shutdownHook);
         }
         catch (IllegalStateException ex) {
            // ignore - VM is already shutting down
         }
      }
   }
}
关闭当前 Spring 应用上下文,也是调用 doClose() 方法,同时如果存在钩子函数则将其从 JVM 中移除,因为上面已经关闭了
doClose 方法
doClose() 方法,关闭当前 Spring 应用上下文,如下:
protected void doClose() {
    // Check whether an actual close attempt is necessary...
    if (this.active.get() && this.closed.compareAndSet(false, true)) {
        // Live Beans JMX 撤销托管
        LiveBeansView.unregisterApplicationContext(this);

        try {
            // Publish shutdown event.
            // 发布当前 Spring 应用上下文关闭事件
            publishEvent(new ContextClosedEvent(this));
        }
        catch (Throwable ex) {
            logger.warn("Exception thrown from ApplicationListener handling ContextClosedEvent", ex);
        }

        // Stop all Lifecycle beans, to avoid delays during individual destruction.
        if (this.lifecycleProcessor != null) {
            try {
                // 关闭 Lifecycle Beans
                this.lifecycleProcessor.onClose();
            }
            catch (Throwable ex) {
                logger.warn("Exception thrown from LifecycleProcessor on context close", ex);
            }
        }

        // Destroy all cached singletons in the context's BeanFactory.
        // 销毁所有的单例 Bean
        destroyBeans();

        // Close the state of this context itself.
        // 关闭底层 BeanFactory 容器
        closeBeanFactory();

        // Let subclasses do some final clean-up if they wish...
        // 提供给子类去实现,用于清理相关资源
        onClose();

        // Reset local application listeners to pre-refresh state.
        if (this.earlyApplicationListeners != null) {
            this.applicationListeners.clear();
            this.applicationListeners.addAll(this.earlyApplicationListeners);
        }

        // Switch to inactive.
        this.active.set(false);
    }
}
主要做以下事情:
1、 LiveBeansJMX撤销托管;
2、 发布当前Spring应用上下文关闭事件;
3. 销毁所有的单例 Bean,调用 DefaultListableBeanFactory#destroySingletons() 方法
4、 关闭底层BeanFactory容器;
5、 回调onClose()方法;
1. 应用上下文启动准备阶段
AbstractApplicationContext#prepareRefresh() 方法,如下:
// AbstractApplicationContext.java
protected void prepareRefresh() {
    // 设置启动时间
    this.startupDate = System.currentTimeMillis();
    // 设置当前 ApplicationContext 的状态
    this.closed.set(false);
    this.active.set(true);

    // Initialize any placeholder property sources in the context environment.
    // 初始化 ApplicationContext 的 Environment(上下文环境)的相关属性,交由子类去实现,如果是 Web 则会设置 ServletContext 和 ServletConfig
    initPropertySources();

    // Validate that all properties marked as required are resolvable:
    // see ConfigurablePropertyResolver#setRequiredProperties
    // 对属性进行必要的验证
    getEnvironment().validateRequiredProperties();

    // Store pre-refresh ApplicationListeners...
    if (this.earlyApplicationListeners == null) {
        this.earlyApplicationListeners = new LinkedHashSet<>(this.applicationListeners);
    }
    else {
        // Reset local application listeners to pre-refresh state.
        this.applicationListeners.clear();
        this.applicationListeners.addAll(this.earlyApplicationListeners);
    }

    // Allow for the collection of early ApplicationEvents,
    // to be published once the multicaster is available...
    this.earlyApplicationEvents = new LinkedHashSet<>();
}
主要做了以下事情:
1、 设置启动时间:startupDate;
2、 设置Spring应用上下文的状态标识:closed(false)、active(true);
3、 初始化PropertySources-initPropertySources(),初始化ApplicationContext的Environment(上下文环境)的相关属性,交由子类去实现,如果是Web则会设置ServletContext和ServletConfig;
4、 校验Environment中必须属性;
5、 初始化早期Spring事件集合earlyApplicationEvents,注意这里创建了一个空的集合,也就是不为null,回到前面的publishEvent(...)方法,如果earlyApplicationEvents不为null则会添加到这个集合里面,不会进行广播这一步的目的就是在Spring应用上下文还未完全就绪时,如果发布了事件,则需要先存储起来,等就绪后才进行广播;
2. BeanFactory 创建阶段
整个过程会创建一个 DefaultListableBeanFactory 对象作为底层 IoC 容器,然后从资源文件或者根据指定路径下 .class 文件(标注了@ Component 注解)加载出所有的 BeanDefinition
2.1 obtainFreshBeanFactory 方法
AbstractApplicationContext#obtainFreshBeanFactory() 方法,如下:
protected ConfigurableListableBeanFactory obtainFreshBeanFactory() {
    refreshBeanFactory();
    return getBeanFactory();
}
这两个方法都是抽象方法,交由子类实现,我们来看到 AbstractRefreshableApplicationContext 的实现
2.2 refreshBeanFactory 方法
AbstractRefreshableApplicationContext#refreshBeanFactory() 方法,如下:
@Override
protected final void refreshBeanFactory() throws BeansException {
    // 若已有 BeanFactory ,销毁它的 Bean 们,并销毁 BeanFactory
    if (hasBeanFactory()) {
        destroyBeans();
        closeBeanFactory();
    }
    try {
        // 创建 DefaultListableBeanFactory 对象
        DefaultListableBeanFactory beanFactory = createBeanFactory();
        // 指定序列化编号
        beanFactory.setSerializationId(getId());
        // 定制 BeanFactory 相关属性(是否允许 BeanDefinition 重复定义,是否允许循环依赖,默认都是允许)
        customizeBeanFactory(beanFactory);
        // 加载 BeanDefinition 们
        loadBeanDefinitions(beanFactory);
        synchronized (this.beanFactoryMonitor) {
            this.beanFactory = beanFactory;
        }
    }
    catch (IOException ex) {
        throw new ApplicationContextException("I/O error parsing bean definition source for " + getDisplayName(), ex);
    }
}

protected DefaultListableBeanFactory createBeanFactory() {
    return new DefaultListableBeanFactory(getInternalParentBeanFactory());
}

protected void customizeBeanFactory(DefaultListableBeanFactory beanFactory) {
    if (this.allowBeanDefinitionOverriding != null) {
        beanFactory.setAllowBeanDefinitionOverriding(this.allowBeanDefinitionOverriding);
    }
    if (this.allowCircularReferences != null) {
        beanFactory.setAllowCircularReferences(this.allowCircularReferences);
    }
}
主要做以下事情:
1、 若已有BeanFactory,销毁它的Bean们,并销毁BeanFactory;
2、 创建BeanFactory,DefaultListableBeanFactory对象;
3、 设置BeanFactoryId;
4、 定制BeanFactory相关属性(是否允许BeanDefinition重复定义,是否允许循环依赖,默认都是允许);
5、 加载出BeanDefinition们-loadBeanDefinitions(DefaultListableBeanFactorybeanFactory)方法,交由子类实现(主要是XML和Annotation的区别);
6、 关联BeanFactory到Spring应用上下文(ApplicationContext);
上面第6 步会将第 2 步创建的 DefaultListableBeanFactory 设置为 Spring 应用上下文的 BeanFactory 对象,也就可以通过 getBeanFactory() 获取
我们再来看到 loadBeanDefinitions(...) 抽象方法的实现,主要为注解和 XML 的区别,先来看到 AbstractXmlApplicationContext 的实现
2.3 loadBeanDefinitions 方法(XML)
AbstractXmlApplicationContext#loadBeanDefinitions(DefaultListableBeanFactory beanFactory) 方法,如下:
@Override
protected void loadBeanDefinitions(DefaultListableBeanFactory beanFactory) throws BeansException, IOException {
    // Create a new XmlBeanDefinitionReader for the given BeanFactory.
    // 创建 XmlBeanDefinitionReader 对象
    XmlBeanDefinitionReader beanDefinitionReader = new XmlBeanDefinitionReader(beanFactory);

    // Configure the bean definition reader with this context's
    // resource loading environment.
    // 对 XmlBeanDefinitionReader 进行环境变量的设置
    beanDefinitionReader.setEnvironment(this.getEnvironment());
    beanDefinitionReader.setResourceLoader(this);
    beanDefinitionReader.setEntityResolver(new ResourceEntityResolver(this));

    // Allow a subclass to provide custom initialization of the reader,
    // then proceed with actually loading the bean definitions.
    // 对 XmlBeanDefinitionReader 进行设置,可以进行覆盖
    initBeanDefinitionReader(beanDefinitionReader);

    // 从 Resource 们中,加载 BeanDefinition 们
    loadBeanDefinitions(beanDefinitionReader);
}

protected void loadBeanDefinitions(XmlBeanDefinitionReader reader) throws BeansException, IOException {
    // 从配置文件 Resource 中,加载 BeanDefinition 们
    Resource[] configResources = getConfigResources();
    if (configResources != null) {
        reader.loadBeanDefinitions(configResources);
    }
    // 从配置文件地址中,加载 BeanDefinition 们
    String[] configLocations = getConfigLocations();
    if (configLocations != null) {
        reader.loadBeanDefinitions(configLocations);
    }
}
可以看到这里创建了 《BeanDefinition 的加载阶段(XML 文件)》这篇文章中讲到的 XmlBeanDefinitionReader 资源解析器对象,然后通过它解析 XML 配置文件,解析过程在之前的文章中已经分析过了。
配置文件怎么来的呢?
在 《死磕Spring MVC源码分析 - WebApplicationContext 容器的初始化》的 ContextLoader#configureAndRefreshWebApplicationContext(...) 方法中可以看到,会将 web.xml 文件中配置的 contextConfigLocation 设置到 Spring 应用上下文中
我们再来看到 AnnotationConfigWebApplicationContext 的实现
2.3 loadBeanDefinitions 方法(注解)
AnnotationConfigWebApplicationContext#loadBeanDefinitions(DefaultListableBeanFactory beanFactory) 方法,如下:
@Override
protected void loadBeanDefinitions(DefaultListableBeanFactory beanFactory) {
    AnnotatedBeanDefinitionReader reader = getAnnotatedBeanDefinitionReader(beanFactory);
    ClassPathBeanDefinitionScanner scanner = getClassPathBeanDefinitionScanner(beanFactory);

    BeanNameGenerator beanNameGenerator = getBeanNameGenerator();
    if (beanNameGenerator != null) {
        reader.setBeanNameGenerator(beanNameGenerator);
        scanner.setBeanNameGenerator(beanNameGenerator);
        beanFactory.registerSingleton(AnnotationConfigUtils.CONFIGURATION_BEAN_NAME_GENERATOR, beanNameGenerator);
    }

    ScopeMetadataResolver scopeMetadataResolver = getScopeMetadataResolver();
    if (scopeMetadataResolver != null) {
        reader.setScopeMetadataResolver(scopeMetadataResolver);
        scanner.setScopeMetadataResolver(scopeMetadataResolver);
    }

    if (!this.componentClasses.isEmpty()) {
        if (logger.isDebugEnabled()) {
            logger.debug("Registering component classes: [" +
                    StringUtils.collectionToCommaDelimitedString(this.componentClasses) + "]");
        }
        reader.register(ClassUtils.toClassArray(this.componentClasses));
    }

    if (!this.basePackages.isEmpty()) {
        if (logger.isDebugEnabled()) {
            logger.debug("Scanning base packages: [" +
                    StringUtils.collectionToCommaDelimitedString(this.basePackages) + "]");
        }
        // 扫描指定包路径下 @Component 注解的 .class 文件,会解析出 BeanDefinition 对象
        scanner.scan(StringUtils.toStringArray(this.basePackages));
    }

    String[] configLocations = getConfigLocations();
    if (configLocations != null) {
        for (String configLocation : configLocations) {
            try {
                Class<?> clazz = ClassUtils.forName(configLocation, getClassLoader());
                if (logger.isTraceEnabled()) {
                    logger.trace("Registering [" + configLocation + "]");
                }
                reader.register(clazz);
            }
            catch (ClassNotFoundException ex) {
                if (logger.isTraceEnabled()) {
                    logger.trace("Could not load class for config location [" + configLocation +
                            "] - trying package scan. " + ex);
                }
                int count = scanner.scan(configLocation);
                if (count == 0 && logger.isDebugEnabled()) {
                    logger.debug("No component classes found for specified class/package [" + configLocation + "]");
                }
            }
        }
    }
}

protected ClassPathBeanDefinitionScanner getClassPathBeanDefinitionScanner(DefaultListableBeanFactory beanFactory) {
    return new ClassPathBeanDefinitionScanner(beanFactory, true, getEnvironment());
}
我们主要看到关键的一步,会创建一个 ClassPathBeanDefinitionScanner 扫描器对象,然后调用其 scan(String... basePackages) 方法去扫描指定包路径下的 .class 文件,整个扫描过程在 《BeanDefinition 的解析过程(面向注解)》 这篇文章中已经分析过了
3. BeanFactory 准备阶段
AbstractApplicationContext#prepareBeanFactory(ConfigurableListableBeanFactory) 方法,如下:
protected void prepareBeanFactory(ConfigurableListableBeanFactory beanFactory) {
    // 设置 ClassLoader 类加载器
    beanFactory.setBeanClassLoader(getClassLoader());
    // 设置 BeanExpressionResolver 表达式语言处理器,Spring 3 开始增加了对语言表达式的支持,例如可以使用 #{bean.xxx} 的形式来调用这个 Bean 的属性值
    beanFactory.setBeanExpressionResolver(new StandardBeanExpressionResolver(beanFactory.getBeanClassLoader()));
    // 添加一个默认的 PropertyEditorRegistrar 属性编辑器
    beanFactory.addPropertyEditorRegistrar(new ResourceEditorRegistrar(this, getEnvironment()));

    /*
     * 添加一个 BeanPostProcessor 处理器,ApplicationContextAwareProcessor,初始化 Bean 的**前置**处理
     * 这个 BeanPostProcessor 其实是对几种 Aware 接口的处理,调用其 setXxx 方法
     * 可以跳到 AbstractAutowireCapableBeanFactory 的 initializeBean(...) 方法(调用 Bean 的初始化方法)中看看
     */
    beanFactory.addBeanPostProcessor(new ApplicationContextAwareProcessor(this));
    // 忽略 Aware 回调接口作为依赖注入接口
    beanFactory.ignoreDependencyInterface(EnvironmentAware.class);
    beanFactory.ignoreDependencyInterface(EmbeddedValueResolverAware.class);
    beanFactory.ignoreDependencyInterface(ResourceLoaderAware.class);
    beanFactory.ignoreDependencyInterface(ApplicationEventPublisherAware.class);
    beanFactory.ignoreDependencyInterface(MessageSourceAware.class);
    beanFactory.ignoreDependencyInterface(ApplicationContextAware.class);

    // 设置几个自动装配的特殊规则,当你自动注入下面这些类型的 Bean 时,注入的就是右边的值
    // 可以看到 ApplicationContext.class 对应当前对象
    beanFactory.registerResolvableDependency(BeanFactory.class, beanFactory);
    beanFactory.registerResolvableDependency(ResourceLoader.class, this);
    beanFactory.registerResolvableDependency(ApplicationEventPublisher.class, this);
    beanFactory.registerResolvableDependency(ApplicationContext.class, this);

    // Register early post-processor for detecting inner beans as ApplicationListeners.
    // 添加一个 BeanPostProcessor 处理器,ApplicationListenerDetector,用于装饰监听器
    // 初始化 Bean 的时候,如果是 ApplicationListener 类型且为单例模式,则添加到 Spring 应用上下文
    beanFactory.addBeanPostProcessor(new ApplicationListenerDetector(this));

    // 增加对 AspectJ 的支持,AOP 相关
    if (beanFactory.containsBean(LOAD_TIME_WEAVER_BEAN_NAME)) {
        beanFactory.addBeanPostProcessor(new LoadTimeWeaverAwareProcessor(beanFactory));
        // Set a temporary ClassLoader for type matching.
        beanFactory.setTempClassLoader(new ContextTypeMatchClassLoader(beanFactory.getBeanClassLoader()));
    }

    // 注册几个 ApplicationContext 上下文默认的 Bean 对象
    if (!beanFactory.containsLocalBean(ENVIRONMENT_BEAN_NAME)) {
        beanFactory.registerSingleton(ENVIRONMENT_BEAN_NAME, getEnvironment());
    }
    if (!beanFactory.containsLocalBean(SYSTEM_PROPERTIES_BEAN_NAME)) {
        beanFactory.registerSingleton(SYSTEM_PROPERTIES_BEAN_NAME, getEnvironment().getSystemProperties());
    }
    if (!beanFactory.containsLocalBean(SYSTEM_ENVIRONMENT_BEAN_NAME)) {
        beanFactory.registerSingleton(SYSTEM_ENVIRONMENT_BEAN_NAME, getEnvironment().getSystemEnvironment());
    }
}
主要做以下事情:
1、 设置ClassLoader类加载器;
2. 设置 BeanExpressionResolver 表达式语言处理器,Spring 3 开始增加了对语言表达式的支持,例如可以使用 #{bean.xxx} 的形式来获取这个 Bean 的属性值
3、 添加一个默认的PropertyEditorRegistrar属性编辑器-ResourceEditorRegistrar;
4、 添加一个BeanPostProcessor处理器-ApplicationContextAwareProcessor,相关Aware回调接口的实现,调用其setXxx方法;
5、 忽略Aware回调接口作为依赖注入接口;
6、 注册ResolvableDependency对象-BeanFactory、ResourceLoader、ApplicationEventPublisher以及ApplicationContext,依赖注入这几个对象时注入的都是当前Spring应用上下文,在《@Autowired等注解的实现原理》这篇文章中有讲到;
7、 添加一个BeanPostProcessor处理器-ApplicationListenerDetector,初始化Bean的时候,如果是ApplicationListener类型且为单例模式,则添加到Spring应用上下文;
8、 添加一个BeanPostProcessor处理器-LoadTimeWeaverAwareProcessor,增加对AspectJ的支持,AOP相关;
9、 注册几个单例对象-Environment、SystemProperties(JavaSystemProperties)、SystemEnvironment(OS环境变量);
4. BeanFactory 后置处理阶段
有序地执行所有 BeanFactoryPostProcessor(包括 BeanDefinitionRegistryPostProcessor)处理器,例如 @Bean 等注解定义的 Bean 的就是通过 BeanDefinitionRegistryPostProcessor 处理器接续出来的
4.1 postProcessBeanFactory 方法
该抽象方法交由子类实现,例如 AbstractRefreshableWebApplicationContext#postProcessBeanFactory(ConfigurableListableBeanFactory) 方法,如下:
@Override
protected void postProcessBeanFactory(ConfigurableListableBeanFactory beanFactory) {
    // 添加 ServletContextAwareProcessor 到 BeanFactory 容器中,
    // 该 processor 实现 BeanPostProcessor 接口,主要用于将 ServletContext 传递给实现了 ServletContextAware 接口的 bean
    beanFactory.addBeanPostProcessor(new ServletContextAwareProcessor(this.servletContext, this.servletConfig));
    // 忽略 ServletContextAware、ServletConfigAware,上面的 ServletContextAwareProcessor 已代替
    beanFactory.ignoreDependencyInterface(ServletContextAware.class);
    beanFactory.ignoreDependencyInterface(ServletConfigAware.class);

    // 注册 WEB 应用特定的域(scope)到 beanFactory 中,以便 WebApplicationContext 可以使用它们。
    // 比如'request','session','globalSession','application'
    WebApplicationContextUtils.registerWebApplicationScopes(beanFactory, this.servletContext);
    // 注册 WEB 应用特定的 Environment bean 到 beanFactory 中,以便 WebApplicationContext 可以使用它们
    // 如:'contextParameters','contextAttributes'
    WebApplicationContextUtils.registerEnvironmentBeans(beanFactory, this.servletContext, this.servletConfig);
}
添加ServletContext 相关内容
4.2 invokeBeanFactoryPostProcessors 方法
AbstractApplicationContext#invokeBeanFactoryPostProcessors(ConfigurableListableBeanFactory) 方法,如下:
protected void invokeBeanFactoryPostProcessors(ConfigurableListableBeanFactory beanFactory) {
    // 执行所有的BeanFactoryPostProcessor处理器
    PostProcessorRegistrationDelegate.invokeBeanFactoryPostProcessors(beanFactory, getBeanFactoryPostProcessors());

    // Detect a LoadTimeWeaver and prepare for weaving, if found in the meantime
    // (e.g. through an @Bean method registered by ConfigurationClassPostProcessor)
    // 在 prepareBeanFactory() 方法中也有相同操作
    if (beanFactory.getTempClassLoader() == null && beanFactory.containsBean(LOAD_TIME_WEAVER_BEAN_NAME)) {
        beanFactory.addBeanPostProcessor(new LoadTimeWeaverAwareProcessor(beanFactory));
        beanFactory.setTempClassLoader(new ContextTypeMatchClassLoader(beanFactory.getBeanClassLoader()));
    }
}
这里借助于 PostProcessorRegistrationDelegate 这个类执行所有 BeanFactoryPostProcessor 处理器,对前面创建的 BeanFactory 进行后置处理
4.3 invokeBeanFactoryPostProcessors 方法
PostProcessorRegistrationDelegate#invokeBeanFactoryPostProcessors 方法,如下(方法比较长,可直接查看下面的总结):
public static void invokeBeanFactoryPostProcessors(ConfigurableListableBeanFactory beanFactory, List<BeanFactoryPostProcessor> beanFactoryPostProcessors) {

    // Invoke BeanDefinitionRegistryPostProcessors first, if any.
    Set<String> processedBeans = new HashSet<>();

    // <1> 执行当前 Spring 应用上下文和底层 BeanFactory 容器中的 BeanFactoryPostProcessor、BeanDefinitionRegistryPostProcessor 们的处理
    if (beanFactory instanceof BeanDefinitionRegistry) {
        BeanDefinitionRegistry registry = (BeanDefinitionRegistry) beanFactory;
        List<BeanFactoryPostProcessor> regularPostProcessors = new ArrayList<>();
        List<BeanDefinitionRegistryPostProcessor> registryProcessors = new ArrayList<>();

        // `<1.1>` 先遍历当前 Spring 应用上下文中的 beanFactoryPostProcessors,如果是 BeanDefinitionRegistryPostProcessor 类型则进行处理
        for (BeanFactoryPostProcessor postProcessor : beanFactoryPostProcessors) {
            if (postProcessor instanceof BeanDefinitionRegistryPostProcessor) {
                BeanDefinitionRegistryPostProcessor registryProcessor = (BeanDefinitionRegistryPostProcessor) postProcessor;
                // 执行
                registryProcessor.postProcessBeanDefinitionRegistry(registry);
                // 添加,以供后续执行其他 postProcessBeanFactory(registry) 方法
                registryProcessors.add(registryProcessor);
            }
            else {
                regularPostProcessors.add(postProcessor);
            }
        }

        // Do not initialize FactoryBeans here: We need to leave all regular beans
        // uninitialized to let the bean factory post-processors apply to them!
        // Separate between BeanDefinitionRegistryPostProcessors that implement
        // PriorityOrdered, Ordered, and the rest.
        // 临时变量,用于临时保存 BeanFactory 容器中的 BeanDefinitionRegistryPostProcessor 对象
        List<BeanDefinitionRegistryPostProcessor> currentRegistryProcessors = new ArrayList<>();

        // First, invoke the BeanDefinitionRegistryPostProcessors that implement PriorityOrdered.
        // <1.2> 获取底层 BeanFactory 容器中所有 BeanDefinitionRegistryPostProcessor 类型的 Bean 们,遍历进行处理
        String[] postProcessorNames = beanFactory.getBeanNamesForType(BeanDefinitionRegistryPostProcessor.class, true, false);
        for (String ppName : postProcessorNames) {
            // 如果实现了 PriorityOrdered 接口,则获取到对应的 Bean
            if (beanFactory.isTypeMatch(ppName, PriorityOrdered.class)) {
                // 初始化
                currentRegistryProcessors.add(beanFactory.getBean(ppName, BeanDefinitionRegistryPostProcessor.class));
                processedBeans.add(ppName);
            }
        }
        // 排序
        sortPostProcessors(currentRegistryProcessors, beanFactory);
        // 临时保存起来
        registryProcessors.addAll(currentRegistryProcessors);
        // 执行
        invokeBeanDefinitionRegistryPostProcessors(currentRegistryProcessors, registry);
        // 清理
        currentRegistryProcessors.clear();

        // Next, invoke the BeanDefinitionRegistryPostProcessors that implement Ordered.
        // <1.3> 获取底层 BeanFactory 容器中所有 BeanDefinitionRegistryPostProcessor 类型的 Bean 们,遍历进行处理
        postProcessorNames = beanFactory.getBeanNamesForType(BeanDefinitionRegistryPostProcessor.class, true, false);
        for (String ppName : postProcessorNames) {
            // 如果实现了 Ordered 接口并且没有执行过,则获取到对应的 Bean
            if (!processedBeans.contains(ppName) && beanFactory.isTypeMatch(ppName, Ordered.class)) { // Ordered类型
                // 初始化
                currentRegistryProcessors.add(beanFactory.getBean(ppName, BeanDefinitionRegistryPostProcessor.class));
                processedBeans.add(ppName);
            }
        }
        // 排序
        sortPostProcessors(currentRegistryProcessors, beanFactory);
        // 临时保存起来
        registryProcessors.addAll(currentRegistryProcessors);
        // 执行
        invokeBeanDefinitionRegistryPostProcessors(currentRegistryProcessors, registry);
        // 清理
        currentRegistryProcessors.clear();

        // Finally, invoke all other BeanDefinitionRegistryPostProcessors until no further ones appear.
        boolean reiterate = true;
        while (reiterate) {
            reiterate = false;
            // <1.4> 获取底层 BeanFactory 容器中所有 BeanDefinitionRegistryPostProcessor 类型的 Bean 们,遍历进行处理
            postProcessorNames = beanFactory.getBeanNamesForType(BeanDefinitionRegistryPostProcessor.class, true, false);
            for (String ppName : postProcessorNames) {
                // 如果该 BeanDefinitionRegistryPostProcessors 在上述过程中没有执行过,则获取到对应的 Bean
                if (!processedBeans.contains(ppName)) {
                    // 初始化
                    currentRegistryProcessors.add(beanFactory.getBean(ppName, BeanDefinitionRegistryPostProcessor.class));
                    processedBeans.add(ppName);
                    reiterate = true;
                }
            }
            // 排序
            sortPostProcessors(currentRegistryProcessors, beanFactory);
            // 临时保存起来
            registryProcessors.addAll(currentRegistryProcessors);
            // 执行
            invokeBeanDefinitionRegistryPostProcessors(currentRegistryProcessors, registry);
            // 清理
            currentRegistryProcessors.clear();
        }

        // Now, invoke the postProcessBeanFactory callback of all processors handled so far.
        /*
         * <1.5> 上述执行完当前 Spring 应用上下文和底层 BeanFactory 容器中所有 BeanDefinitionRegistryPostProcessor 处理器中的 postProcessBeanDefinitionRegistry(registry) 方法后,
         * 接下来执行它们的 postProcessBeanFactory(beanFactory) 方法
         *
         * 注意:BeanDefinitionRegistryPostProcessor 继承 BeanFactoryPostProcessor 接口
         */
        invokeBeanFactoryPostProcessors(registryProcessors, beanFactory);
        /*
         * <1.6> 这里我们执行当前 Spring 应用上下文中 BeanFactoryPostProcessor 处理器(非 BeanDefinitionRegistryPostProcessors 类型)的
         * postProcessBeanFactory(beanFactory) 方法
         *
         * 例如:PropertyPlaceholderConfigurer、PropertySourcesPlaceholderConfigurer
         */
        invokeBeanFactoryPostProcessors(regularPostProcessors, beanFactory);
    }

    // <2> 执行当前 Spring 应用上下文中的 BeanFactoryPostProcessor 处理器的 postProcessBeanFactory(beanFactory) 方法
    else {
        // Invoke factory processors registered with the context instance.
        invokeBeanFactoryPostProcessors(beanFactoryPostProcessors, beanFactory);
    }

    // Do not initialize FactoryBeans here: We need to leave all regular beans
    // uninitialized to let the bean factory post-processors apply to them!
    // <3> 获取底层 BeanFactory 容器中所有 BeanFactoryPostProcessor 类型的 Bean 们
    String[] postProcessorNames = beanFactory.getBeanNamesForType(BeanFactoryPostProcessor.class, true, false);

    // Separate between BeanFactoryPostProcessors that implement PriorityOrdered,
    // Ordered, and the rest.
    List<BeanFactoryPostProcessor> priorityOrderedPostProcessors = new ArrayList<>();
    List<String> orderedPostProcessorNames = new ArrayList<>();
    List<String> nonOrderedPostProcessorNames = new ArrayList<>();
    for (String ppName : postProcessorNames) {
        if (processedBeans.contains(ppName)) { // 上面已经执行过了则跳过
            // skip - already processed in first phase above
        }
        else if (beanFactory.isTypeMatch(ppName, PriorityOrdered.class)) { // PriorityOrdered
            priorityOrderedPostProcessors.add(beanFactory.getBean(ppName, BeanFactoryPostProcessor.class));
        }
        else if (beanFactory.isTypeMatch(ppName, Ordered.class)) { // Ordered
            orderedPostProcessorNames.add(ppName);
        }
        else { // nonOrder
            nonOrderedPostProcessorNames.add(ppName);
        }
    }

    // First, invoke the BeanFactoryPostProcessors that implement PriorityOrdered.
    // <3.1> PriorityOrdered 类型的 BeanFactoryPostProcessor 对象
    // 排序
    sortPostProcessors(priorityOrderedPostProcessors, beanFactory);
    // 执行
    invokeBeanFactoryPostProcessors(priorityOrderedPostProcessors, beanFactory);

    // Next, invoke the BeanFactoryPostProcessors that implement Ordered.
    // <3.2> Ordered 类型的 BeanFactoryPostProcessor 对象
    List<BeanFactoryPostProcessor> orderedPostProcessors = new ArrayList<>();
    for (String postProcessorName : orderedPostProcessorNames) {
        orderedPostProcessors.add(beanFactory.getBean(postProcessorName, BeanFactoryPostProcessor.class));
    }
    // 排序
    sortPostProcessors(orderedPostProcessors, beanFactory);
    // 执行
    invokeBeanFactoryPostProcessors(orderedPostProcessors, beanFactory);

    // Finally, invoke all other BeanFactoryPostProcessors.
    // <3.2> nonOrdered 的 BeanFactoryPostProcessor 对象
    List<BeanFactoryPostProcessor> nonOrderedPostProcessors = new ArrayList<>();
    for (String postProcessorName : nonOrderedPostProcessorNames) {
        nonOrderedPostProcessors.add(beanFactory.getBean(postProcessorName, BeanFactoryPostProcessor.class));
    }
    // 无需排序,直接执行
    invokeBeanFactoryPostProcessors(nonOrderedPostProcessors, beanFactory);

    // Clear cached merged bean definitions since the post-processors might have
    // modified the original metadata, e.g. replacing placeholders in values...
    beanFactory.clearMetadataCache();
}
主要做以下事情:
1、 如果当前Spring应用上下文是BeanDefinitionRegistry类型,则执行当前Spring应用上下文中所有BeanDefinitionRegistryPostProcessor、BeanFactoryPostProcessor的处理,以及底层BeanFactory容器中BeanDefinitionRegistryPostProcessor的处理,处理顺序如下:;
1.  当前 Spring 应用上下文中所有 BeanDefinitionRegistryPostProcessor\#postProcessBeanDefinitionRegistry
2.  底层 BeanFactory 容器中所有 BeanDefinitionRegistryPostProcessor\#postProcessBeanDefinitionRegistry(优先级:PriorityOrdered > Ordered > 无)
3.  当前 Spring 应用上下文和底层 BeanFactory 容器中所有 BeanDefinitionRegistryPostProcessor\#postProcessBeanFactory
4.  当前 Spring 应用上下文中所有 BeanFactoryPostProcessor\#postProcessBeanFactory
- 否则,执行当前 Spring 应用上下文中所有 BeanFactoryPostProcessor#postProcessBeanFactory
- 执行底层 BeanFactory 容器中所有 BeanFactoryPostProcessor#postProcessBeanFactory,上面已经处理过的会跳过,执行顺序和上面一样:PriorityOrdered > Ordered > 无
总结:有序地执行所有 BeanFactoryPostProcessor(包括 BeanDefinitionRegistryPostProcessor)处理器
5. BeanFactory 注册 BeanPostProcessor 阶段
将所有已加载出来的 BeanPostProcessor 类型的 BeanDefinition 通过依赖查找获取到 Bean 们,然后有序的添加至 BeanFactory 中
AbstractApplicationContext#registerBeanPostProcessors(ConfigurableListableBeanFactory) 方法,如下:
protected void registerBeanPostProcessors(ConfigurableListableBeanFactory beanFactory) {
    PostProcessorRegistrationDelegate.registerBeanPostProcessors(beanFactory, this);
}
这里也借助于 PostProcessorRegistrationDelegate 这个类注册所有 BeanPostProcessor 处理器,如下:
public static void registerBeanPostProcessors(ConfigurableListableBeanFactory beanFactory, AbstractApplicationContext applicationContext) {

    // <1> 获取所有的 BeanPostProcessor 类型的 beanName
    // 这些 beanName 都已经全部加载到容器中去,但是没有实例化
    String[] postProcessorNames = beanFactory.getBeanNamesForType(BeanPostProcessor.class, true, false);

    // Register BeanPostProcessorChecker that logs an info message when
    // a bean is created during BeanPostProcessor instantiation, i.e. when
    // a bean is not eligible for getting processed by all BeanPostProcessors.
    // <2> 记录所有的 BeanPostProcessor 数量,为什么加 1 ?因为下面又添加了一个
    int beanProcessorTargetCount = beanFactory.getBeanPostProcessorCount() + 1 + postProcessorNames.length;
    // 注册 BeanPostProcessorChecker,它主要是用于在 BeanPostProcessor 实例化期间记录日志
    // 当 Spring 中高配置的后置处理器还没有注册就已经开始了 bean 的实例化过程,这个时候便会打印 BeanPostProcessorChecker 中的内容
    beanFactory.addBeanPostProcessor(new BeanPostProcessorChecker(beanFactory, beanProcessorTargetCount));

    // Separate between BeanPostProcessors that implement PriorityOrdered, Ordered, and the rest.
    // <3> 开始注册 BeanPostProcessor
    // 实现了 PriorityOrdered 接口的 BeanPostProcessor 对应的 Bean 集合
    List<BeanPostProcessor> priorityOrderedPostProcessors = new ArrayList<>();
    // MergedBeanDefinitionPostProcessor 类型对应的 Bean 集合
    List<BeanPostProcessor> internalPostProcessors = new ArrayList<>();
    // 实现了 Ordered 接口的 BeanPostProcessor 对应的 beanName 集合
    List<String> orderedPostProcessorNames = new ArrayList<>();
    // 没有顺序的 BeanPostProcessor 对应的 beanName 集合
    List<String> nonOrderedPostProcessorNames = new ArrayList<>();
    for (String ppName : postProcessorNames) {
        // PriorityOrdered
        if (beanFactory.isTypeMatch(ppName, PriorityOrdered.class)) {
            // 调用 getBean(...) 方法获取该 BeanPostProcessor 处理器的 Bean 对象
            BeanPostProcessor pp = beanFactory.getBean(ppName, BeanPostProcessor.class);
            priorityOrderedPostProcessors.add(pp);
            if (pp instanceof MergedBeanDefinitionPostProcessor) {
                internalPostProcessors.add(pp);
            }
        }
        // Ordered
        else if (beanFactory.isTypeMatch(ppName, Ordered.class)) {
            orderedPostProcessorNames.add(ppName);
        }
        // 无序
        else {
            nonOrderedPostProcessorNames.add(ppName);
        }
    }

    // First, register the BeanPostProcessors that implement PriorityOrdered.
    // 第一步,对所有实现了 PriorityOrdered 的 BeanPostProcessor 进行排序
    sortPostProcessors(priorityOrderedPostProcessors, beanFactory);
    // 进行注册,也就是添加至 DefaultListableBeanFactory 中
    registerBeanPostProcessors(beanFactory, priorityOrderedPostProcessors);

    // Next, register the BeanPostProcessors that implement Ordered.
    // 第二步,获取所有实现了 Ordered 接口的 BeanPostProcessor 对应的 Bean 们
    List<BeanPostProcessor> orderedPostProcessors = new ArrayList<>();
    for (String ppName : orderedPostProcessorNames) {
        // 调用 getBean(...) 方法获取该 BeanPostProcessor 处理器的 Bean 对象
        BeanPostProcessor pp = beanFactory.getBean(ppName, BeanPostProcessor.class);
        orderedPostProcessors.add(pp);
        if (pp instanceof MergedBeanDefinitionPostProcessor) {
            internalPostProcessors.add(pp);
        }
    }
    // 对所有实现了 Ordered 的 BeanPostProcessor 进行排序
    sortPostProcessors(orderedPostProcessors, beanFactory);
    // 进行注册,也就是添加至 DefaultListableBeanFactory 中
    registerBeanPostProcessors(beanFactory, orderedPostProcessors);

    // Now, register all regular BeanPostProcessors.
    // 第三步注册所有无序的 BeanPostProcessor
    List<BeanPostProcessor> nonOrderedPostProcessors = new ArrayList<>();
    for (String ppName : nonOrderedPostProcessorNames) {
        // 调用 getBean(...) 方法获取该 BeanPostProcessor 处理器的 Bean 对象
        BeanPostProcessor pp = beanFactory.getBean(ppName, BeanPostProcessor.class);
        nonOrderedPostProcessors.add(pp);
        if (pp instanceof MergedBeanDefinitionPostProcessor) {
            internalPostProcessors.add(pp);
        }
    }
    // 注册,无需排序
    registerBeanPostProcessors(beanFactory, nonOrderedPostProcessors);

    // Finally, re-register all internal BeanPostProcessors.
    // 最后,注册所有的 MergedBeanDefinitionPostProcessor 类型的 Bean 们
    sortPostProcessors(internalPostProcessors, beanFactory);
    registerBeanPostProcessors(beanFactory, internalPostProcessors);

    // Re-register post-processor for detecting inner beans as ApplicationListeners,
    // moving it to the end of the processor chain (for picking up proxies etc).
    // 重新注册 ApplicationListenerDetector(探测器),用于探测内部 ApplicationListener 类型的 Bean
    // 在完全初始化 Bean 后,如果是 ApplicationListener 类型且为单例模式,则添加到 Spring 应用上下文
    beanFactory.addBeanPostProcessor(new ApplicationListenerDetector(applicationContext));
}
主要做以下事情:
1、 获取所有BeanPostProcessor类型的beanName;
2、 添加BeanPostProcessor-BeanPostProcessorChecker,用于打印日志(所有BeanPostProcessor还没有全部实例化就有Bean初始化完成);
3、 获取所有BeanPostProcessor实现类(依赖查找),添加至BeanFactory容器中(顺序:PriorityOrdered>Ordered>无);
4、 注意,第3步添加的BeanPostProcessor如果是MergedBeanDefinitionPostProcessor类型,会再次添加(先移除再添加,也就是将顺序往后挪);
5、 重新添加BeanPostProcessor-ApplicationListenerDetector,目的将其移至最后,因为这个后置处理器用于探测ApplicationListener类型的Bean,需要保证Bean完全初始化,放置最后比较合适;
对与上述第
4步是否疑惑?我的理解是 MergedBeanDefinitionPostProcessor 主要是依赖注入的实现,需要保证当前 Spring Bean 的相关初始化工作已完成,然后再进行依赖注入
总结:将所有已加载出来的 BeanPostProcessor 类型的 BeanDefinition 通过依赖查找获取到 Bean 们,然后有序的添加至 BeanFactory 中
6. 初始化内建 Bean:MessageSource
AbstractApplicationContext#initMessageSource() 方法,如下:
protected void initMessageSource() {
    ConfigurableListableBeanFactory beanFactory = getBeanFactory();
    // 如果当前上下文中包含名称为 messageSource 的 Bean 对象
    if (beanFactory.containsLocalBean(MESSAGE_SOURCE_BEAN_NAME)) {
        this.messageSource = beanFactory.getBean(MESSAGE_SOURCE_BEAN_NAME, MessageSource.class);
        // 如果有父 ApplicationContext,并且 messageSource 为 HierarchicalMessageSource 对象,分级处理的 MessageSource
        if (this.parent != null && this.messageSource instanceof HierarchicalMessageSource) {
            HierarchicalMessageSource hms = (HierarchicalMessageSource) this.messageSource;
            if (hms.getParentMessageSource() == null) {
                // Only set parent context as parent MessageSource if no parent MessageSource registered already.
                // 如果 messageSource 没有注册父 MessageSource,则设置为父类上下文的的 MessageSource
                hms.setParentMessageSource(getInternalParentMessageSource());
            }
        }
        if (logger.isTraceEnabled()) {
            logger.trace("Using MessageSource [" + this.messageSource + "]");
        }
    }
    else {
        // Use empty MessageSource to be able to accept getMessage calls.
        // 使用空 MessageSource
        DelegatingMessageSource dms = new DelegatingMessageSource();
        dms.setParentMessageSource(getInternalParentMessageSource());
        this.messageSource = dms;
        beanFactory.registerSingleton(MESSAGE_SOURCE_BEAN_NAME, this.messageSource);
        if (logger.isTraceEnabled()) {
            logger.trace("No '" + MESSAGE_SOURCE_BEAN_NAME + "' bean, using [" + this.messageSource + "]");
        }
    }
}
初始化当前 Spring 应用上下文的 MessageSource 对象,MessageSource 对象和国际化文案相关,Spring 默认情况不提供国际化文案,但是 MessageSource Bean 对象(空实现)是存在的,在 Spring Boot 中有实现,参考 MessageSourceAutoConfiguration 自动装配类
7. 初始化内建 Bean:Spring 事件广播器
AbstractApplicationContext#initApplicationEventMulticaster() 方法,如下:
protected void initApplicationEventMulticaster() {
    ConfigurableListableBeanFactory beanFactory = getBeanFactory();
    // 如果当前上下文中包含名称为 applicationEventMulticaster 的 Bean 对象
    if (beanFactory.containsLocalBean(APPLICATION_EVENT_MULTICASTER_BEAN_NAME)) {
        this.applicationEventMulticaster = beanFactory.getBean(APPLICATION_EVENT_MULTICASTER_BEAN_NAME, ApplicationEventMulticaster.class);
    }
    else {
        // 没有则新建 SimpleApplicationEventMulticaster,并将该 Bean 注册至当前上下文
        this.applicationEventMulticaster = new SimpleApplicationEventMulticaster(beanFactory);
        beanFactory.registerSingleton(APPLICATION_EVENT_MULTICASTER_BEAN_NAME, this.applicationEventMulticaster);
    }
}
初始化当前 Spring 应用上下文的 ApplicationEventMulticaster 事件广播器对象,Spring 默认情况下为 SimpleApplicationEventMulticaster 对象
8.应用上下文刷新扩展阶段
AbstractApplicationContext#onRefresh() 方法,空方法,交由子类实现,如 AbstractRefreshableWebApplicationContext 的实现
@Override
protected void onRefresh() {
    this.themeSource = UiApplicationContextUtils.initThemeSource(this);
}
Web场景下的 Spring 应用上下文会初始化 ThemeSource 对象
9. Spring 事件监听器注册阶段
AbstractApplicationContext#registerListeners() 方法,如下:
protected void registerListeners() {
    // <1> 将当前 Spring 应用上下文已有的事件监听器依次添加至事件广播器
    for (ApplicationListener<?> listener : getApplicationListeners()) {
        getApplicationEventMulticaster().addApplicationListener(listener);
    }

    // Do not initialize FactoryBeans here: We need to leave all regular beans
    // uninitialized to let post-processors apply to them!
    // <2> 从底层 BeanFactory 容器中获取所有 ApplicationListener 类型的 beanName 们(还未初始化),然后依次添加至事件广播器
    String[] listenerBeanNames = getBeanNamesForType(ApplicationListener.class, true, false);
    for (String listenerBeanName : listenerBeanNames) {
        getApplicationEventMulticaster().addApplicationListenerBean(listenerBeanName);
    }

    // Publish early application events now that we finally have a multicaster...
    //<3> 至此,已经完成将事件监听器全部添加至事件广播器,接下来将早期的事件通过该事件广播器广播到所有的事件监听器
    // 早期事件:在当前 Spring 应用上下文刷新的过程中已经发布的事件(此时发布不会被监听到,因为事件监听器才刚全部找到,需要到此处通过事件广播器进行广播)
    Set<ApplicationEvent> earlyEventsToProcess = this.earlyApplicationEvents;
    /**
     * 将 earlyApplicationEvents 置为 null
     * 这里很关键!!!后续发布的事件不再是早期事件,会立即被事件广播器广播。因为当前 Spring 应用中的事件广播器已经就绪了,事件监听器也都获取到了(虽然还没有初始化)
     * 不过在下面广播的时候,如果事件监听器能够处理该事件,则会通过依赖注入的方式初始化该事件监听器
     */
    this.earlyApplicationEvents = null;
    if (earlyEventsToProcess != null) {
        for (ApplicationEvent earlyEvent : earlyEventsToProcess) {
            // 广播该事件,能够处理该事件的事件监听器会被初始化
            getApplicationEventMulticaster().multicastEvent(earlyEvent);
        }
    }
}
主要做以下事情:
1、 将当前Spring应用上下文已有的事件监听器依次添加至事件广播器;
2、 从底层BeanFactory容器中获取所有ApplicationListener类型的beanName们(还未初始化),然后依次添加至事件广播器;
3、 复制全部的earlyApplicationEvents早期事件,然后将earlyApplicationEvents置为null;
4、 广播早期事件,如果事件监听器能够处理该事件,则会通过依赖注入的方式初始化该事件监听器;
早期事件:在当前 Spring 应用上下文刷新的过程中已经发布的事件(此时发布不会被监听到,因为事件监听器才刚全部找到,需要到此处通过事件广播器进行广播)
上面第3 步会将 earlyApplicationEvents 置为 null,前面的 publishEvent 方法中你可以看到,如果该对象为 null 则会直接广播事件
10. BeanFactory 初始化完成阶段
主要为底层 BeanFactory 容器设置 ConversionService 类型转换器,初始化所有还未初始化的 Bean(不是抽象、单例模式、不是懒加载方式)
finishBeanFactoryInitialization 方法
AbstractApplicationContext#finishBeanFactoryInitialization(ConfigurableListableBeanFactory) 方法,如下:
protected void finishBeanFactoryInitialization(ConfigurableListableBeanFactory beanFactory) {
    // 如果底层 BeanFactory 容器包含 ConversionService 类型转换器,则初始化并设置到底层 BeanFactory 容器的属性中
    if (beanFactory.containsBean(CONVERSION_SERVICE_BEAN_NAME) && beanFactory.isTypeMatch(CONVERSION_SERVICE_BEAN_NAME, ConversionService.class)) {
        beanFactory.setConversionService(beanFactory.getBean(CONVERSION_SERVICE_BEAN_NAME, ConversionService.class));
    }

    // 如果底层 BeanFactory 容器没有设置 StringValueResolver 解析器,则添加一个 PropertySourcesPropertyResolver 解析器
    if (!beanFactory.hasEmbeddedValueResolver()) {
        beanFactory.addEmbeddedValueResolver(strVal -> getEnvironment().resolvePlaceholders(strVal));
    }

    // Initialize LoadTimeWeaverAware beans early to allow for registering their transformers early.
    // 提前初始化 LoadTimeWeaverAware 类型的 Bean,AOP 相关
    String[] weaverAwareNames = beanFactory.getBeanNamesForType(LoadTimeWeaverAware.class, false, false);
    for (String weaverAwareName : weaverAwareNames) {
        getBean(weaverAwareName);
    }

    // Stop using the temporary ClassLoader for type matching.
    // 将临时的 ClassLoader 置为 null,它主要用于 AOP
    beanFactory.setTempClassLoader(null);

    // Allow for caching all bean definition metadata, not expecting further changes.
    // 冻结底层 BeanFactory 容器所有的 BeanDefinition,目的是不希望再去修改 BeanDefinition
    beanFactory.freezeConfiguration();

    // 【重点】初始化所有还未初始化的 Bean(不是抽象、单例模式、不是懒加载方式),依赖查找
    beanFactory.preInstantiateSingletons();
}
我们看到最后一步,会调用 DefaultListableBeanFactory 的 preInstantiateSingletons() 方法,初始化所有还未初始化的 Bean(不是抽象、单例模式、不是懒加载方式),依赖查找
preInstantiateSingletons 方法
DefaultListableBeanFactory#preInstantiateSingletons() 方法,如下:
@Override
public void preInstantiateSingletons() throws BeansException {
    if (logger.isTraceEnabled()) {
        logger.trace("Pre-instantiating singletons in " + this);
    }

    // Iterate over a copy to allow for init methods which in turn register new bean definitions.
    // While this may not be part of the regular factory bootstrap, it does otherwise work fine.
    // 复制一份本地的所有 beanNames 集合
    List<String> beanNames = new ArrayList<>(this.beanDefinitionNames);

    // Trigger initialization of all non-lazy singleton beans...
    // 遍历所有的 beanName
    for (String beanName : beanNames) {
        // 从容器中获取 beanName 相应的 RootBeanDefinition 对象
        RootBeanDefinition bd = getMergedLocalBeanDefinition(beanName);
        // 如果该 Bean 的定义为:不是抽象、单例模式、不是懒加载方式,则进行初始化
        if (!bd.isAbstract() && bd.isSingleton() && !bd.isLazyInit()) {
            // 如果是 FactoryBean 类型的 Bean
            if (isFactoryBean(beanName)) {
                // 初始化 FactoryBean 类型本身这个 Bean,注意这里在 beanName 的前面添加了一个 '&'
                Object bean = getBean(FACTORY_BEAN_PREFIX + beanName);
                // 如果这个 FactoryBean 为 SmartFactoryBean 类型,并且需要提前初始化
                // 则初始 beanName 对应的 Bean,也就是调用 FactoryBean 的 getObject() 方法
                if (bean instanceof FactoryBean) {
                    final FactoryBean<?> factory = (FactoryBean<?>) bean;
                    boolean isEagerInit;
                    if (System.getSecurityManager() != null && factory instanceof SmartFactoryBean) {
                        isEagerInit = AccessController.doPrivileged((PrivilegedAction<Boolean>)
                                        ((SmartFactoryBean<?>) factory)::isEagerInit,
                                getAccessControlContext());
                    }
                    else {
                        isEagerInit = (factory instanceof SmartFactoryBean && ((SmartFactoryBean<?>) factory).isEagerInit());
                    }
                    if (isEagerInit) {
                        getBean(beanName);
                    }
                }
            }
            else {
                // 初始化 beanName 对应的 Bean
                getBean(beanName);
            }
        }
    }

    // Trigger post-initialization callback for all applicable beans...
    for (String beanName : beanNames) {
        Object singletonInstance = getSingleton(beanName);
        if (singletonInstance instanceof SmartInitializingSingleton) {
            final SmartInitializingSingleton smartSingleton = (SmartInitializingSingleton) singletonInstance;
            if (System.getSecurityManager() != null) {
                AccessController.doPrivileged((PrivilegedAction<Object>) () -> {
                    smartSingleton.afterSingletonsInstantiated();
                    return null;
                }, getAccessControlContext());
            }
            else {
                smartSingleton.afterSingletonsInstantiated();
            }
        }
    }
}
首先会遍历所以的 beanName,如果该 Bean 的定义满足下面三个条件,则进行初始化过程
- 不是抽象
- 单例模式
- 不是懒加载方式
实际就是通过 getBean(String beanName) 方法进行初始化,在前面的 《开启 Bean 的加载》 等文章中已经分析过了。注意,如果是 FactoryBean 类型的 Bean,需要先初始化 FactoryBean 本身这个 Bean,beanName 前面加 &,然后再初始化这个 beanName,也就是调用 FactoryBean#getObject() 方法
在初始化所有的 Bean 后,其实还有一个初始化完成阶段,会遍历所有已初始化好的 Bean,如果是 SmartInitializingSingleton 类型,则调用这个 Bean 的 afterSingletonsInstantiated() 方法
SmartInitializingSingleton 的作用?
通过 getBean(beanName) 初始化一个 Bean 的时候也会初始化依赖的对象,这样可能会出现过早的初始化问题(例如可能有些 BeanPostProcessor 还未添加进来就初始化了),导致相关 Bean 可能还未完全初始化,Spring 4.1 之后就提供了 SmartInitializingSingleton 接口机制让你可以确保 Bean 的初始化行为比较正常。
还有就是在所有的 Bean 完成初始化后,可以在这里进行注解的相关处理,例如 @EventListener 注解就是通过 EventListenerMethodProcessor 实现的,会将@EventListener 注解标注的方法解析成 ApplicationListener 事件监听器,并注册至 Spring 应用上下文。
11. 应用上下文刷新完成阶段
AbstractApplicationContext#finishRefresh() 方法,如下:
protected void finishRefresh() {
    // Clear context-level resource caches (such as ASM metadata from scanning).
    // 清除当前 Spring 应用上下文中的缓存,例如通过 ASM(Java 字节码操作和分析框架)扫描出来的元数据
    clearResourceCaches();

    // Initialize lifecycle processor for this context.
    // 初始化 LifecycleProcessor 到当前上下文的属性中
    initLifecycleProcessor();

    // Propagate refresh to lifecycle processor first.
    // 通过 LifecycleProcessor 启动 Lifecycle 生命周期对象
    getLifecycleProcessor().onRefresh();

    // 发布 ContextRefreshedEvent 事件,会通过事件广播器进行广播,可通过自定义监听器在当前 Spring 应用上下文初始化完后进行相关操作
    publishEvent(new ContextRefreshedEvent(this));

    // Participate in LiveBeansView MBean, if active.
    // 如果当前 Spring 应用上下文的 Environment 环境中配置了 'spring.liveBeansView.mbeanDomain'
    // 则向 MBeanServer(JMX 代理层的核心)托管 Live Beans,也就是让 Spring Bean 桥接到 MBeanServer
    LiveBeansView.registerApplicationContext(this);
}
主要做以下事情:
1、 清除当前Spring应用上下文中的缓存,例如通过ASM(Java字节码操作和分析框架)扫描出来的元数据;
2、 初始化LifecycleProcessor到当前上下文的属性中;
3、 通过LifecycleProcessor启动Lifecycle生命周期对象;
4、 发布ContextRefreshedEvent上下文刷新完成事件,会通过事件广播器进行广播;
5、 如果当前Spring应用上下文的Environment环境中配置了spring.liveBeansView.mbeanDomain,则向MBeanServer(JMX代理层的核心)托管LiveBeans,也就是让SpringBean桥接到MBeanServer;
总结
ApplicationContext 就是大名鼎鼎的 Spring 应用上下文,底层 IoC 容器就是 DefaultListableBeanFactory 这个类,在它的基础上提供出更多的高级功能,更加适用于正式的应用环境。子类 AbstractApplicationContext 抽象类实现了大部分功能,调用它的 refresh() 方法可以让 Spring 应用上下文处于准备就绪状态,使用 Spring 都会显示或者隐式地调用该方法,这个方法中有非常多核心的步骤,这些步骤在上面的每个小节中依次进行分析过,具体过程可查看上面的每个小节。
AbstractApplicationContext#refresh() 方法在哪被调用?
可以看到我的另一篇文章《死磕Spring MVC源码分析 - WebApplicationContext 容器的初始化》,在 Spring MVC 启动过程中,创建 Spring 应用上下文后,(在 ContextLoader#configureAndRefreshWebApplicationContext 方法中)会调用其 refresh() 方法进行刷新,让 Spring 应用上下文准备就绪。
至此,Spring IoC 的相关内容差不多都讲完了,关于 @Bean 等注解的处理在下一篇文章中进行分析。
版权声明:本文不是「本站」原创文章,版权归原作者所有 | 原文地址: