8.HandlerMapping 组件(二)之 HandlerInterceptor 拦截器
8.HandlerMapping 组件(二)之 HandlerInterceptor 拦截器
Spring 版本:5.1.14.RELEASE
该系列其他文档请查看:《死磕 Spring MVC 源码分析 - 文章导读》
HandlerMapping 组件
HandlerMapping 组件,请求的处理器匹配器,负责为请求找到合适的 HandlerExecutionChain 处理器执行链,包含处理器(handler)和拦截器们(interceptors)
- handler 处理器是 Object 类型,可以将其理解成 HandlerMethod 对象(例如我们使用最多的 @RequestMapping 注解所标注的方法会解析成该对象),包含了方法的所有信息,通过该对象能够执行该方法
- HandlerInterceptor 拦截器对处理请求进行增强处理,可用于在执行方法前、成功执行方法后、处理完成后进行一些逻辑处理
由于HandlerMapping 组件涉及到的内容比较多,考虑到内容的排版,所以将这部分内容拆分成了四个模块,依次进行分析:
- 《HandlerMapping 组件(一)之 AbstractHandlerMapping》
- 《HandlerMapping 组件(二)之 HandlerInterceptor 拦截器》
- 《HandlerMapping 组件(三)之 AbstractHandlerMethodMapping》
- 《HandlerMapping 组件(四)之 AbstractUrlHandlerMapping》
HandlerMapping 组件(二)之 HandlerInterceptor 拦截器
在上一篇《HandlerMapping 组件(一)之 AbstractHandlerMapping》文档中分析了 HandlerMapping 组件的 AbstractHandlerMapping 抽象类,在获取HandlerExecutionChain 处理器执行链时,会去寻找匹配的 HandlerInterceptor 拦截器们,并添加到其中。那么本文将分享 Spring MVC 的拦截器相关内容
HandlerInterceptor
org.springframework.web.servlet.HandlerInterceptor,处理器拦截器接口,代码如下:
public interface HandlerInterceptor {
	/**
	 * 前置处理,在 {@link HandlerAdapter#handle(HttpServletRequest, HttpServletResponse, Object)} 执行之前
	 */
	default boolean preHandle(HttpServletRequest request, HttpServletResponse response, Object handler)
			throws Exception {

		return true;
	}

	/**
	 * 后置处理,在 {@link HandlerAdapter#handle(HttpServletRequest, HttpServletResponse, Object)} 执行成功之后
	 */
	default void postHandle(HttpServletRequest request, HttpServletResponse response, Object handler,
			@Nullable ModelAndView modelAndView) throws Exception {
	}

	/**
	 * 完成处理,在 {@link HandlerAdapter#handle(HttpServletRequest, HttpServletResponse, Object)} 执行之后(无论成功还是失败)
	 * 条件:执行 {@link #preHandle(HttpServletRequest, HttpServletResponse, Object)} 成功的拦截器才会执行该方法
	 */
	default void afterCompletion(HttpServletRequest request, HttpServletResponse response, Object handler,
			@Nullable Exception ex) throws Exception {
	}
}
HandlerExecutionChain
org.springframework.web.servlet.HandlerExecutionChain,处理器执行链,也就是通过 HandlerMapping 组件为请求找到的处理对象,包含处理器(handler)和拦截器们(interceptors)
构造方法
public class HandlerExecutionChain {
	/**
	 * 处理器
	 */
	private final Object handler;

	/**
	 * 拦截器数组
	 */
	@Nullable
	private HandlerInterceptor[] interceptors;

	/**
	 * 拦截器数组。
	 *
	 * 在实际使用时,会调用 {@link #getInterceptors()} 方法,初始化到 {@link #interceptors} 中
	 */
	@Nullable
	private List<HandlerInterceptor> interceptorList;

	/**
	 * 已成功执行 {@link HandlerInterceptor#preHandle(HttpServletRequest, HttpServletResponse, Object)} 的位置
	 *
	 * 在 {@link #applyPostHandle} 和 {@link #triggerAfterCompletion} 方法中需要用到,用于倒序执行拦截器的方法
	 */
	private int interceptorIndex = -1;

	public HandlerExecutionChain(Object handler) {
		this(handler, (HandlerInterceptor[]) null);
	}

	public HandlerExecutionChain(Object handler, @Nullable HandlerInterceptor... interceptors) {
		if (handler instanceof HandlerExecutionChain) {
			HandlerExecutionChain originalChain = (HandlerExecutionChain) handler;
			this.handler = originalChain.getHandler();
			this.interceptorList = new ArrayList<>();
			// 将原始的 HandlerExecutionChain 的 interceptors 复制到 this.interceptorList 中
			CollectionUtils.mergeArrayIntoCollection(originalChain.getInterceptors(), this.interceptorList);
			// 将入参的 interceptors 合并到 this.interceptorList 中
			CollectionUtils.mergeArrayIntoCollection(interceptors, this.interceptorList);
		} else {
			this.handler = handler;
			this.interceptors = interceptors;
		}
	}
}
- handler:请求对应的处理器对象,可以先理解为 HandlerMethod 对象(例如我们常用的 @RequestMapping 注解对应的方法会解析成该对象),也就是我们的某个 Method 的所有信息,可以被执行
- interceptors:请求匹配的拦截器数组
- interceptorList:请求匹配的拦截器集合,至于为什么要该属性,我还没看明白😈
- interceptorIndex:记录已成功执行前置处理的拦截器位置,因为已完成处理只会执行前置处理成功的拦截器,且倒序执行
addInterceptor
addInterceptor(HandlerInterceptor interceptor) 方法,添加拦截器到 interceptorList 集合中,方法如下:
public void addInterceptor(HandlerInterceptor interceptor) {
    initInterceptorList().add(interceptor);
}

private List<HandlerInterceptor> initInterceptorList() {
    // 如果 interceptorList 为空,则初始化为 ArrayList
    if (this.interceptorList == null) {
        this.interceptorList = new ArrayList<>();
        // 如果 interceptors 非空,则添加到 interceptorList 中
        if (this.interceptors != null) {
            // An interceptor array specified through the constructor
            CollectionUtils.mergeArrayIntoCollection(this.interceptors, this.interceptorList);
        }
    }
    // 置空 interceptors
    this.interceptors = null;
    // 返回 interceptorList
    return this.interceptorList;
}
getInterceptors
getInterceptors() 方法,获得 interceptors 数组,方法如下:
@Nullable
public HandlerInterceptor[] getInterceptors() {
    // 将 interceptorList 初始化到 interceptors 中
    if (this.interceptors == null && this.interceptorList != null) {
        this.interceptors = this.interceptorList.toArray(new HandlerInterceptor[0]);
    }
    // 返回 interceptors 数组
    return this.interceptors;
}
applyPreHandle
applyPreHandle(HttpServletRequest request, HttpServletResponse response) 方法,执行请求匹配的拦截器的前置处理,方法如下:
boolean applyPreHandle(HttpServletRequest request, HttpServletResponse response) throws Exception {
    // <1> 获得拦截器数组
    HandlerInterceptor[] interceptors = getInterceptors();
    if (!ObjectUtils.isEmpty(interceptors)) {
        // <2> 遍历拦截器数组
        for (int i = 0; i < interceptors.length; i++) {
            HandlerInterceptor interceptor = interceptors[i];
            // <3> 前置处理
            if (!interceptor.preHandle(request, response, this.handler)) {
                // <3.1> 已完成处理 拦截器
                triggerAfterCompletion(request, response, null);
                // 返回 false ,前置处理失败
                return false;
            }
            // <3.2> 标记 interceptorIndex 位置
            this.interceptorIndex = i;
        }
    }
    // <4> 返回 true ,前置处理成功
    return true;
}
1、 获得拦截器数组,通过上面的getInterceptors()方法,获得interceptors数组;
2、 遍历interceptors拦截器数组;
3、 依次执行拦截器的前置处理;
1、 如果有某个拦截器的前置处理失败,则调用triggerAfterCompletion(HttpServletRequestrequest,HttpServletResponseresponse,Exceptionex)方法,触发拦截器们的已完成处理,最后返回false;
2、 每个拦截器成功执行前置处理后,记录当前拦截器的位置到interceptorIndex属性中,为了已完成处理只会执行前置处理成功的拦截器,且倒序执行;
4、 返回true,拦截器们的前置处理都成功;
applyPostHandle
applyPostHandle(HttpServletRequest request, HttpServletResponse response, @Nullable ModelAndView mv) 方法,执行请求匹配的拦截器的后置处理,方法如下:
void applyPostHandle(HttpServletRequest request, HttpServletResponse response, @Nullable ModelAndView mv)
        throws Exception {
    // 获得拦截器数组
    HandlerInterceptor[] interceptors = getInterceptors();
    if (!ObjectUtils.isEmpty(interceptors)) {
        // 遍历拦截器数组
        for (int i = interceptors.length - 1; i >= 0; i--) { // 倒序
            HandlerInterceptor interceptor = interceptors[i];
            // 后置处理
            interceptor.postHandle(request, response, this.handler, mv);
        }
    }
}
- 请求匹配的拦截器的后置处理是倒序执行的
- 如果前置处理没有全部执行成功,或者处理请求的过程中出现异常是不会调用该方法的,也就是不会执行后置处理
triggerAfterCompletion
triggerAfterCompletion(HttpServletRequest request, HttpServletResponse response, Exception ex) 方法,执行请求匹配的拦截器的已完成处理,方法如下:
void triggerAfterCompletion(HttpServletRequest request, HttpServletResponse response, @Nullable Exception ex)
        throws Exception {
    // 获得拦截器数组
    HandlerInterceptor[] interceptors = getInterceptors();
    if (!ObjectUtils.isEmpty(interceptors)) {
        // 遍历拦截器数组
        for (int i = this.interceptorIndex; i >= 0; i--) { // 倒序!!!
            HandlerInterceptor interceptor = interceptors[i];
            try {
                // 已完成处理 拦截器
                interceptor.afterCompletion(request, response, this.handler, ex);
            }
            catch (Throwable ex2) { // 注意,如果执行失败,仅仅会打印错误日志,不会结束循环
                logger.error("HandlerInterceptor.afterCompletion threw exception", ex2);
            }
        }
    }
}
- 请求匹配的拦截器的已完成处理是倒序执行的
- 通过interceptorIndex属性,只会执行前置处理成功的拦截器们,因为该属性定义了成功执行前置处理的拦截器的位置
- 如果前置处理没有全部执行成功,或者处理请求的过程中出现异常还是会调用该方法,也就是会执行已完成处理
HandlerInterceptor 的实现类
HandlerMapping 接口体系的结构如下:
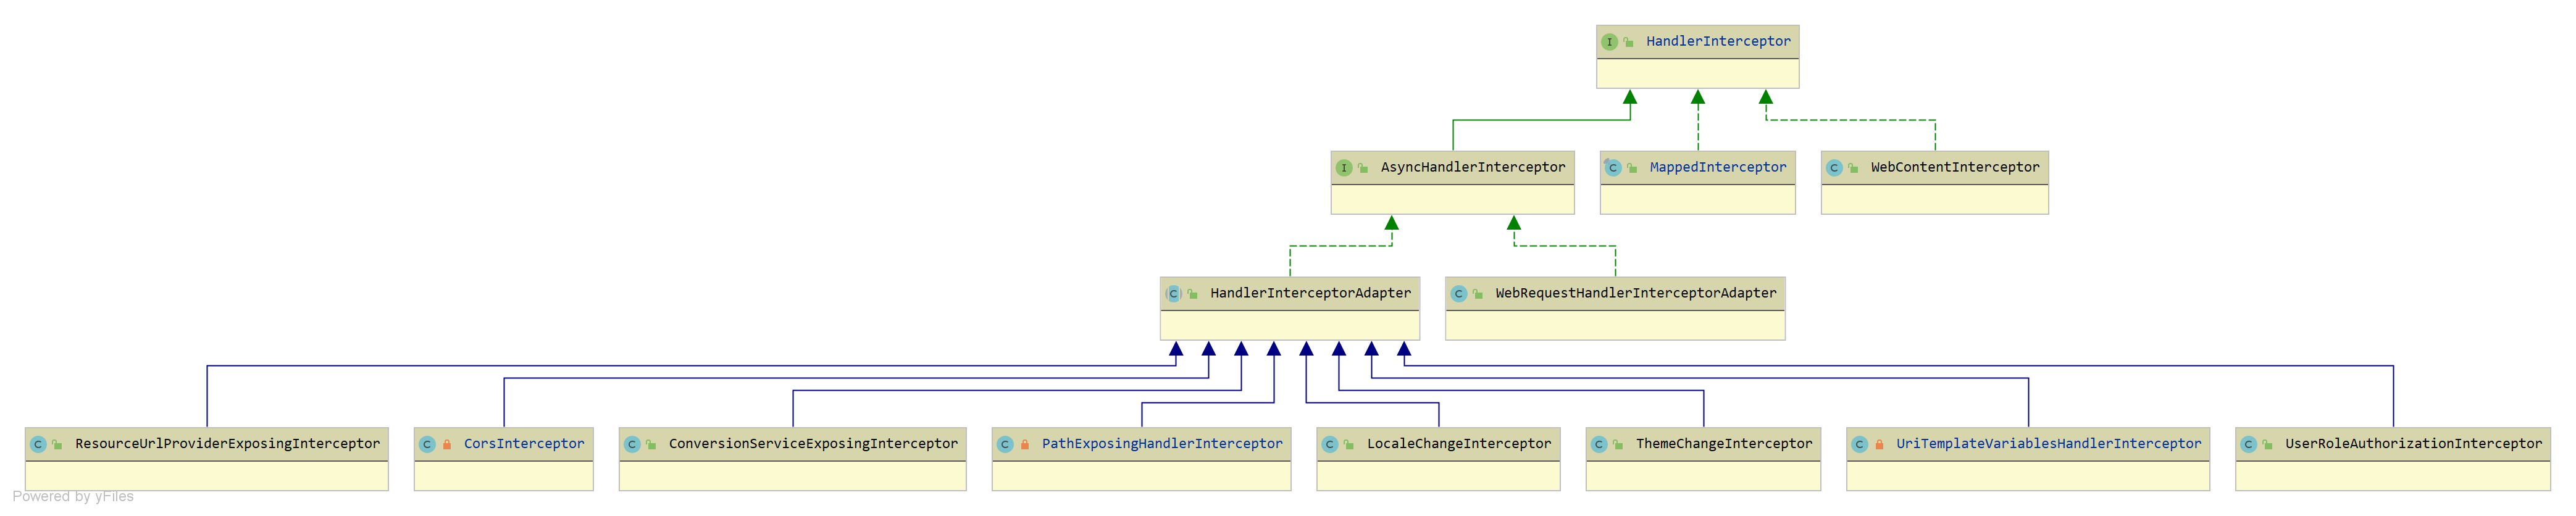
可以看到它的实现类有许多,这里来看几个重要的类
MappedInterceptor
org.springframework.web.servlet.handler.MappedInterceptor,实现 HandlerInterceptor 接口,支持地址匹配的 HandlerInterceptor 实现类
每一个<mvc:interceptor /> 标签,将被解析成一个 MappedInterceptor 类型的 Bean 拦截器对象
构造方法
public final class MappedInterceptor implements HandlerInterceptor {
	/**
	 * 匹配的路径
	 */
	@Nullable
	private final String[] includePatterns;

	/**
	 * 不匹配的路径
	 */
	@Nullable
	private final String[] excludePatterns;

	/**
	 * 拦截器对象
	 */
	private final HandlerInterceptor interceptor;

	/**
	 * 路径匹配器
	 */
	@Nullable
	private PathMatcher pathMatcher;

	public MappedInterceptor(@Nullable String[] includePatterns, HandlerInterceptor interceptor) {
		this(includePatterns, null, interceptor);
	}

	public MappedInterceptor(@Nullable String[] includePatterns, @Nullable String[] excludePatterns,
			HandlerInterceptor interceptor) {
		this.includePatterns = includePatterns;
		this.excludePatterns = excludePatterns;
		this.interceptor = interceptor;
	}

	public MappedInterceptor(@Nullable String[] includePatterns, WebRequestInterceptor interceptor) {
		this(includePatterns, null, interceptor);
	}
}
- includePatterns:拦截器需要匹配的请求路径
- excludePatterns:拦截器需要排除的请求路径
- pathMatcher:路径匹配器
- interceptor:拦截器对象
通过前面三个属性去判断请求是否匹配
matches
matches(String lookupPath, PathMatcher pathMatcher) 方法,判断请求路径是否匹配,方法如下:
public boolean matches(String lookupPath, PathMatcher pathMatcher) {
    PathMatcher pathMatcherToUse = (this.pathMatcher != null ? this.pathMatcher : pathMatcher);
    // <1> 先判断该路径是否在不匹配的路径中
    if (!ObjectUtils.isEmpty(this.excludePatterns)) {
        for (String pattern : this.excludePatterns) {
            if (pathMatcherToUse.match(pattern, lookupPath)) {
                return false;
            }
        }
    }
    // <2> 如果匹配的路径为空,则都匹配通过
    if (ObjectUtils.isEmpty(this.includePatterns)) {
        return true;
    }
    // <3> 判断路径是否在需要匹配的路径中
    for (String pattern : this.includePatterns) {
        if (pathMatcherToUse.match(pattern, lookupPath)) {
            return true;
        }
    }
    return false;
}
1、 先判断该路径是否在不匹配的路径中;
2、 如果匹配的路径为空,则都匹配通过;
3、 判断路径是否在需要匹配的路径中;
拦截方法的实现
@Override
public boolean preHandle(HttpServletRequest request, HttpServletResponse response, Object handler)
        throws Exception {
    return this.interceptor.preHandle(request, response, handler);
}

@Override
public void postHandle(HttpServletRequest request, HttpServletResponse response, Object handler,
        @Nullable ModelAndView modelAndView) throws Exception {
    this.interceptor.postHandle(request, response, handler, modelAndView);
}

@Override
public void afterCompletion(HttpServletRequest request, HttpServletResponse response, Object handler,
        @Nullable Exception ex) throws Exception {
    this.interceptor.afterCompletion(request, response, handler, ex);
}
都是直接调用interceptor拦截器对应的方法
其他
使用示例
1. <mvc:interceptors> 标签
<mvc:interceptors>
    <mvc:interceptor>
        <mvc:mapping path="/**" />
        <mvc:exclude-mapping path="/error/**" />
        <bean class="com.fullmoon.study.interceptor.JwtInterceptor" />
    </mvc:interceptor>
</mvc:interceptors>
- 每一个
<mvc:interceptor />标签,将被解析成一个 MappedInterceptor 类型的 Bean 拦截器对象 - 然后 MappedInterceptor 类型的拦截器在 AbstractHandlerMapping 的 initApplicationContext() ->` detectMappedInterceptors 会被扫描到
protected void detectMappedInterceptors(List<HandlerInterceptor> mappedInterceptors) {
    // 扫描已注册的 MappedInterceptor 的 Bean 们,添加到 mappedInterceptors 中
    // MappedInterceptor 会根据请求路径做匹配,是否进行拦截
    mappedInterceptors.addAll(BeanFactoryUtils
            .beansOfTypeIncludingAncestors(obtainApplicationContext(), MappedInterceptor.class, true, false)
            .values());
}
也就是说在初始化 HandlerMapping 组件的时候会扫描到我们自定义的拦截器,并添加到属性中
<mvc:interceptor /> 标签如何被解析成MappedInterceptor对象的?
可以来看到spring-webmvc工程的 spring.handlers 文件,如下:
http\://www.springframework.org/schema/mvc=org.springframework.web.servlet.config.MvcNamespaceHandler
指定了NamespaceHandler 为 MvcNamespaceHandler 对象,也就是说<mvc />标签会被该对象进行解析,如下:
public class MvcNamespaceHandler extends NamespaceHandlerSupport {
	@Override
	public void init() {
		registerBeanDefinitionParser("annotation-driven", new AnnotationDrivenBeanDefinitionParser());
		registerBeanDefinitionParser("default-servlet-handler", new DefaultServletHandlerBeanDefinitionParser());
		registerBeanDefinitionParser("interceptors", new InterceptorsBeanDefinitionParser());
		registerBeanDefinitionParser("resources", new ResourcesBeanDefinitionParser());
		registerBeanDefinitionParser("view-controller", new ViewControllerBeanDefinitionParser());
		registerBeanDefinitionParser("redirect-view-controller", new ViewControllerBeanDefinitionParser());
		registerBeanDefinitionParser("status-controller", new ViewControllerBeanDefinitionParser());
		registerBeanDefinitionParser("view-resolvers", new ViewResolversBeanDefinitionParser());
		registerBeanDefinitionParser("tiles-configurer", new TilesConfigurerBeanDefinitionParser());
		registerBeanDefinitionParser("freemarker-configurer", new FreeMarkerConfigurerBeanDefinitionParser());
		registerBeanDefinitionParser("groovy-configurer", new GroovyMarkupConfigurerBeanDefinitionParser());
		registerBeanDefinitionParser("script-template-configurer", new ScriptTemplateConfigurerBeanDefinitionParser());
		registerBeanDefinitionParser("cors", new CorsBeanDefinitionParser());
	}
}
其中<mvc:interceptor />标签则会被 InterceptorsBeanDefinitionParser 对象进行解析,如下:
class InterceptorsBeanDefinitionParser implements BeanDefinitionParser {
	@Override
	@Nullable
	public BeanDefinition parse(Element element, ParserContext context) {
		context.pushContainingComponent(
				new CompositeComponentDefinition(element.getTagName(), context.extractSource(element)));

		RuntimeBeanReference pathMatcherRef = null;
		if (element.hasAttribute("path-matcher")) {
			pathMatcherRef = new RuntimeBeanReference(element.getAttribute("path-matcher"));
		}

		List<Element> interceptors = DomUtils.getChildElementsByTagName(element, "bean", "ref", "interceptor");
		for (Element interceptor : interceptors) {
			// 将 <mvc:interceptor /> 标签解析 MappedInterceptor 对象
			RootBeanDefinition mappedInterceptorDef = new RootBeanDefinition(MappedInterceptor.class);
			mappedInterceptorDef.setSource(context.extractSource(interceptor));
			mappedInterceptorDef.setRole(BeanDefinition.ROLE_INFRASTRUCTURE);

			ManagedList<String> includePatterns = null;
			ManagedList<String> excludePatterns = null;
			Object interceptorBean;
			if ("interceptor".equals(interceptor.getLocalName())) {
				includePatterns = getIncludePatterns(interceptor, "mapping");
				excludePatterns = getIncludePatterns(interceptor, "exclude-mapping");
				Element beanElem = DomUtils.getChildElementsByTagName(interceptor, "bean", "ref").get(0);
				interceptorBean = context.getDelegate().parsePropertySubElement(beanElem, null);
			}
			else {
				interceptorBean = context.getDelegate().parsePropertySubElement(interceptor, null);
			}
			mappedInterceptorDef.getConstructorArgumentValues().addIndexedArgumentValue(0, includePatterns);
			mappedInterceptorDef.getConstructorArgumentValues().addIndexedArgumentValue(1, excludePatterns);
			mappedInterceptorDef.getConstructorArgumentValues().addIndexedArgumentValue(2, interceptorBean);

			if (pathMatcherRef != null) {
				mappedInterceptorDef.getPropertyValues().add("pathMatcher", pathMatcherRef);
			}

			String beanName = context.getReaderContext().registerWithGeneratedName(mappedInterceptorDef);
			context.registerComponent(new BeanComponentDefinition(mappedInterceptorDef, beanName));
		}

		context.popAndRegisterContainingComponent();
		return null;
	}

	private ManagedList<String> getIncludePatterns(Element interceptor, String elementName) {
		List<Element> paths = DomUtils.getChildElementsByTagName(interceptor, elementName);
		ManagedList<String> patterns = new ManagedList<>(paths.size());
		for (Element path : paths) {
			patterns.add(path.getAttribute("path"));
		}
		return patterns;
	}
}
逻辑不复杂,会将 <mvc:interceptor /> 标签解析 BeanDefinition 对象,beanClass 为 MappedInterceptor,解析出来的属性也会添加至其中,也就会给初始化成 MappedInterceptor 类型的 Spring Bean 到 Spring 上下文中
2. Java Config
在SpringBoot 2.0+ 项目中,添加拦截器的方式可以如下:
@Component
public class JwtInterceptor implements HandlerInterceptor {
    /**
     * 前置处理
     *
     * @param handler  拦截的目标,处理器
     * @return 该请求是否继续往下执行
     */
    @Override
    public boolean preHandle(HttpServletRequest request, HttpServletResponse response, Object handler) throws Exception {
        // JWT 校验
        // 验证通过,返回 true,否则返回false
        return true;
    }
    /** 后置处理 */
    @Override
    public void postHandle(HttpServletRequest request, HttpServletResponse response, Object handler, ModelAndView modelAndView)
        throws Exception {
    }
    /** 已完成处理 */
    @Override
    public void afterCompletion(HttpServletRequest request, HttpServletResponse response, Object handler, Exception ex)
        throws Exception {
    }
}

@Configuration
public class InterceptorConfig implements WebMvcConfigurer {

    @Override
    public void addInterceptors(InterceptorRegistry registry) {
        List<String> excludePath = new ArrayList<>();
        // 将拦截器添加至 InterceptorRegistry
		registry.addInterceptor(jwtInterceptor()).addPathPatterns("/**").excludePathPatterns(excludePath);
    }

    @Bean
    public JwtInterceptor jwtInterceptor() {
        return new JwtInterceptor();
    }

}
- 使用的过程中,如果patterns路径没有设置好,可能在请求过程中发生的错误会被拦截器拦截到,可以在拦截器中根据自定义注解进行拦截处理
因为JwtInterceptor 不是 MappedInterceptor 类型的拦截器,不会被 AbstractHandlerMapping 探测到,既然这样子,那么我们就直接调用 AbstractHandlerMapping 的 setInterceptors(Object... interceptors) 设置进去不就好了
由于 Spring 5.0 废弃了 WebMvcConfigurerAdapter,所以需要通过 WebMvcConfigurer 接口来添加我们的拦截器,那么在 Spring Boot 2.0+ 中是如何将 WebMvcConfigurer 添加的拦截器设置到 AbstractHandlerMapping 对象中的呢?接下来开始简单的分析
先来看到 spring-boot-autoconfigure 项目中的 WebMvcAutoConfiguration 自动配置类,其中有一个内部静态类 EnableWebMvcConfiguration,继承了 DelegatingWebMvcConfiguration 对象(spring-webmvc 项目中),部分代码如下:
@Configuration(proxyBeanMethods = false)
@EnableConfigurationProperties(WebProperties.class)
public static class EnableWebMvcConfiguration extends DelegatingWebMvcConfiguration implements ResourceLoaderAware {
    // ... 省略相关代码
}
回到我们的 spring-webmvc项目,来看到 org.springframework.web.servlet.config.annotation.DelegatingWebMvcConfiguration 这个类,继承 WebMvcConfigurationSupport 类,部分代码如下:
@Configuration
public class DelegatingWebMvcConfiguration extends WebMvcConfigurationSupport {

    /** WebMvcConfigurer 组合类,内部方法就是遍历所有的 WebMvcConfigurer 实现类 */
	private final WebMvcConfigurerComposite configurers = new WebMvcConfigurerComposite();

	@Autowired(required = false)
	public void setConfigurers(List<WebMvcConfigurer> configurers) {
		if (!CollectionUtils.isEmpty(configurers)) {
            // <1> 注入所有的 WebMvcConfigurer 实现类到 configurers 中
			this.configurers.addWebMvcConfigurers(configurers);
		}
	}

    @Override
	protected void addInterceptors(InterceptorRegistry registry) {
        // <2> 调用 WebMvcConfigurer 组合类的 addInterceptors(InterceptorRegistry registry) 方法
		this.configurers.addInterceptors(registry);
	}
}

// org.springframework.web.servlet.config.annotation.WebMvcConfigurerComposite.java
class WebMvcConfigurerComposite implements WebMvcConfigurer {
	@Override
	public void addInterceptors(InterceptorRegistry registry) {
        // <3> 依次执行 WebMvcConfigurer 实现类的 addInterceptors 方法,将对应的拦截器添加至 registry 中
		for ( WebMvcConfigurer delegate : this.delegates) {
			delegate.addInterceptors(registry);
		}
	}
}
1、 注入所有的WebMvcConfigurer实现类到configurers中,示例中我们自定义的InterceptorConfig就会被注入到这里;
2、 调用WebMvcConfigurer组合类的addInterceptors(InterceptorRegistryregistry)方法,看第3步;
3、 依次执行WebMvcConfigurer实现类的addInterceptors(InterceptorRegistryregistry)方法,将对应的拦截器添加至registry中调用示例中我们自定义的InterceptorConfig方法,则将我们自定义JwtInterceptor拦截器添加至registry中了;
再来看到 org.springframework.web.servlet.config.annotation.WebMvcConfigurationSupport 这个类,部分代码如下:
public class WebMvcConfigurationSupport implements ApplicationContextAware, ServletContextAware {
    @Bean
	public RequestMappingHandlerMapping requestMappingHandlerMapping() {
		RequestMappingHandlerMapping mapping = createRequestMappingHandlerMapping();
		mapping.setOrder(0);
		mapping.setInterceptors(getInterceptors());
		// ... 省略相关代码
		return mapping;
	}

    protected final Object[] getInterceptors() {
		// 若 interceptors 未初始化,则进行初始化
		if (this.interceptors == null) {
			// 创建 InterceptorRegistry 对象
			InterceptorRegistry registry = new InterceptorRegistry();
			// 添加拦截器到 interceptors 中
			addInterceptors(registry);
			// 添加内置拦截器到 interceptors 中
			registry.addInterceptor(new ConversionServiceExposingInterceptor(mvcConversionService()));
			registry.addInterceptor(new ResourceUrlProviderExposingInterceptor(mvcResourceUrlProvider()));
			// 初始化到 interceptors 属性
			this.interceptors = registry.getInterceptors();
		}
		// 若 interceptors 已初始化,则直接返回
		return this.interceptors.toArray();
	}
}
逻辑并不复杂,可以看到 Spring MVC 用到的 RequestMappingHandlerMapping 对象会通过 addInterceptors(InterceptorRegistry registry) 方法,获取到我们自定义InterceptorConfig中添加的JwtInterceptor 拦截器,并设置到 RequestMappingHandlerMapping 对象中
总结
本文对Spring MVC 处理请求的过程中使用到的 HandlerMapping 组件中的 HandlerInterceptor 拦截器进行了分析,DispatcherServlet 在处理请求的过程中,会执行 HandlerMapping 组件中与请求匹配的拦截器,进行一些拦截处理。拦截器的在项目中会经常使用到,应用场景比较多,例如权限校验、参数预处理等等,上面也提供了相应的使用示例
拦截器有以下三个方法:
- preHandle:前置处理,在执行方法前执行,全部成功执行才会往下执行方法
- postHandle:后置处理,在成功执行方法后执行,倒序
- afterCompletion:已完成处理,不管方法是否成功执行都会执行,不过只会执行前置处理成功的拦截器,倒序
多个拦截器的执行顺序就是自定义 WebMvcConfigurer 实现类添加拦截器时所加入的顺序
参考文章:芋道源码《死磕 Spring MVC 源码分析》
版权声明:本文不是「本站」原创文章,版权归原作者所有 | 原文地址: