03 第一个CRUD
03 第一个CRUD
前言
通过上一篇文章中介绍的内容,我们已经将苏三商城项目的骨架已经搭建起来了。
并且已经将module,已经module中的代码目录也规划好了。
在正式开发之前,还需要完成下面两件事:
- 调好访问数据库代码
- 需要创建CRUD模板代码
数据库是这个项目的关键,从数据库读数据,向数据库写数据,必须要先调好。
创建一个CRUD模板代码,是为了后面写的代码风格都能够统一,也就是业界说的比较多的:规范,以便于今后能够更好的这个项目的代码。
接下来,开始今天的内容。
1. 访问数据库
目前项目中的application.yml文件中,已经配置了dataSource的url、username和password等信息,但还不够。
如果我们将password故意改错,正确的是:123456,改成:1234561。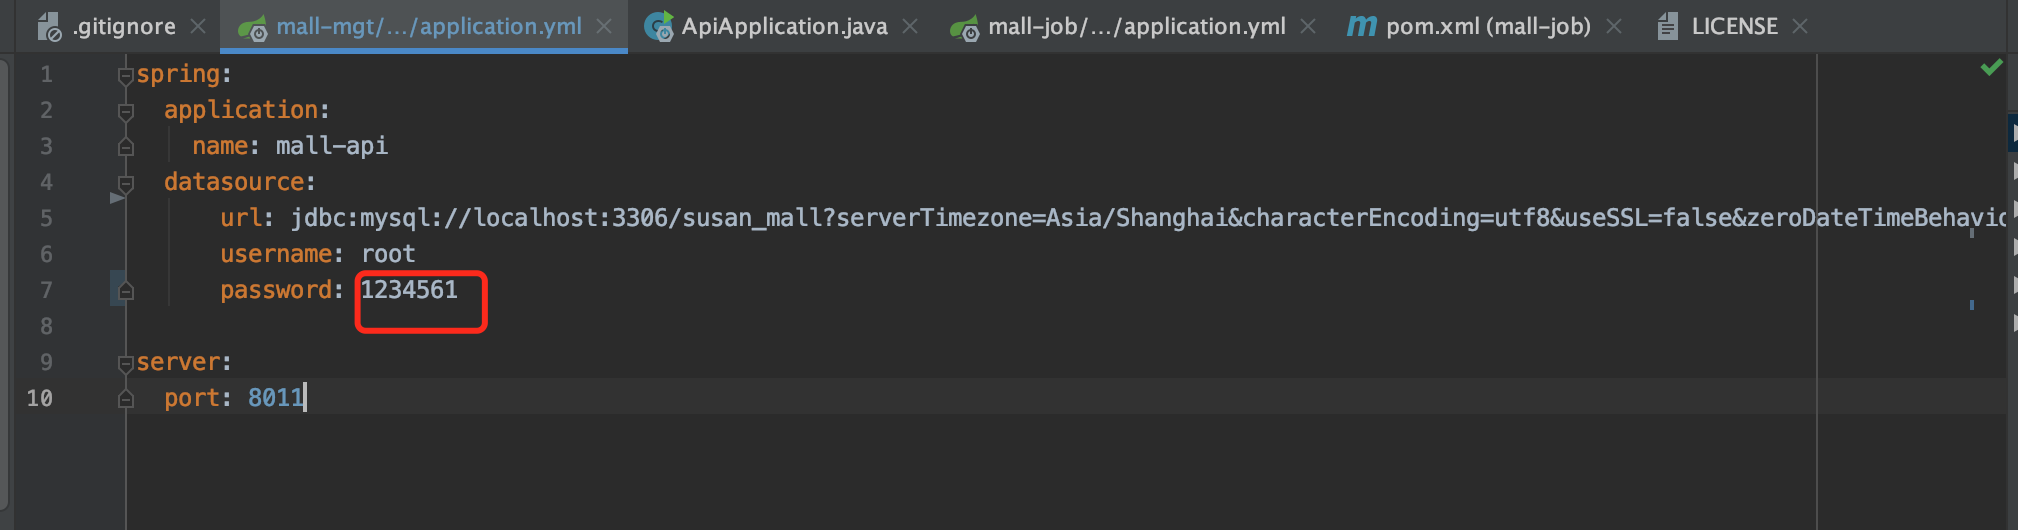
发现SpringBoot项目仍然可以正常启动。
SpringBoot项目在启动的时候,会自动加载DataSourceAutoConfiguration类,读取dataSource配置信息,此时并没有真正去访问数据库。
接下来,关键是把访问数据库搞定。
我们持久化框架决定使用Mybatis,因为它用起来更灵活更方便。
这里没有选择Mybatis-Plus,主要有以下几方面的考虑:
- Mybatis-Plus听说有一些bug。
- 后面会配合代码生成工具可以自动生成一些代码和配置文件,目前使用MyBatis就够了。
- 可以更深入的使用Mybatis的有些强大的用法。
1.1 引入Mybatis的依赖
要使用Mybatis的功能,首先需要引入相关的依赖包。
这是一个小妙招:最好不要使用版本不匹配的jar包,容易出现很多莫名其妙的问题。
在模板mall-business的pom.xml文件中添加如下配置:
<properties>
  ...
   <mybatis.version>2.3.2</mybatis.version>
</properties>
...
<dependency>
    <groupId>org.mybatis.spring.boot</groupId>
    <artifactId>mybatis-spring-boot-starter</artifactId>
    <version>${mybatis.version}</version>
</dependency>
刷新maven之后,会发现Mybatis相关依赖都引入到项目中了:
1.2 增加mybatis-config文件
接下来,需要添加mybatis-config.xml配置文件,可以配置Mybatis的全局参数。
<?xml version="1.0" encoding="UTF-8" ?>
<!DOCTYPE configuration
        PUBLIC "-//mybatis.org//DTD Config 3.0//EN"
        "http://mybatis.org/dtd/mybatis-3-config.dtd">
<configuration>
    <properties>

    </properties>
    <typeAliases>
    </typeAliases>
    <typeHandlers>
    </typeHandlers>
</configuration>
这个文件,目前可以空着,后面在开发的过程中会用到,可以定义全局的常量、类型转换器、拦截器等。
2. CRUD模板代码
为了写一个完整的CRUD模板代码,需要在数据库中创建一张表,我们以用户表为例,创建sql如下:
CREATE TABLE `user` (
  `id` bigint NOT NULL AUTO_INCREMENT COMMENT 'ID',
  `user_name` varchar(30)  DEFAULT NULL COMMENT '用户名',
  `create_user_id` bigint NOT NULL COMMENT '创建人ID',
  `create_user_name` varchar(30) NOT NULL COMMENT '创建人名称',
  `create_time` datetime(3) NOT NULL COMMENT '创建日期',
  `update_user_id` bigint DEFAULT NULL COMMENT '修改人ID',
  `update_user_name` varchar(30)  DEFAULT NULL COMMENT '修改人名称',
  `update_time` datetime(3) DEFAULT NULL COMMENT '修改日期',
  `is_del` tinyint(1) DEFAULT '0',
  PRIMARY KEY (`id`) USING BTREE
) ENGINE=InnoDB AUTO_INCREMENT=1 DEFAULT CHARSET=utf8mb4 COMMENT='用户表'
表名是user,表中包含了id是主键,username表示用户名。
而create_user_id、create_user_name、create_time、update_user_id、update_user_name、update_time和is_del是几个公共字段,后面的其他表都有这几个字段。
考虑到商城暂时不用于分布式环境,id暂且设置成数据库自动增长的。
为了避免表情等特殊服务显示的问题,CHARSET没有使用utf8,而直接使用了utf8mb4。
为了数据好恢复,后面的删除都是逻辑删除,避免物理删除的情况,因此加了is_del字段,默认是未删除。
2.1 增加实体类
为了代码的通用性,可以将上面说到的几个公共字段定义到一个基础类中。
@AllArgsConstructor
@NoArgsConstructor
@Data
public class BaseEntity implements Serializable {

    /**
     * 系统ID
     */
    private Long id;

    /**
     * 创建人ID
     */
    private Long createUserId;

    /**
     * 创建人名称
     */
    private String createUserName;

    /**
     * 创建时间
     */
    private Date createTime;

    /**
     * 修改人ID
     */
    private Long updateUserId;

    /**
     * 修改人名称
     */
    private String updateUserName;

    /**
     * 修改时间
     */
    private Date updateTime;

    /**
     * 是否删除
     */
    private Integer isDel;
}
使用了lombok的@Data,增加getter和setter方法,使用@NoArgsConstructor注解增加一个无参的构造方法,使用@AllArgsConstructor注解,增加一个包含所有成员变量的构造方法。
该类实现了Serializable接口,方便后面序列化和反序列化。
有了这个基础类,那么接下来的用户实体类就简单了:
@Data
@NoArgsConstructor
public class UserEntity extends BaseEntity {

    /**
     * 用户名称
     */
    private String userName;
}
2.2 增加Mapper
UserEntity类已经创建好了,接下来可以增加UserMapper接口。
代码如下:
public interface UserMapper {

    /**
     * 通过id查询用户信息
     *
     * @param id 系统ID
     * @return 用户信息
     */
    UserEntity findById(Long id);

    /**
     * 根据条件查询用户列表
     *
     * @param userConditionEntity 条件
     * @return 用户列表
     */
    List<UserEntity> searchByCondition(UserConditionEntity userConditionEntity);

    /**
     * 根据条件查询用户数量
     *
     * @param userConditionEntity 条件
     * @return 用户列表
     */
    int searchCount(UserConditionEntity userConditionEntity);

    /**
     * 添加用户
     *
     * @param userEntity 用户实体
     * @return 影响行数
     */
    int insert(UserEntity userEntity);

    /**
     * 修改用户
     *
     * @param userEntity 用户实体
     * @return 影响行数
     */
    int update(UserEntity userEntity);

    /**
     * 删除用户
     *
     * @param id 用户ID
     * @return 影响行数
     */
    int deleteById(Long id);
}
注意UserMapper只是一个接口,接口的实现是通过Mybais的代理类做的。
这里也没有加@Mapper注解,每个Mapper接口都需要加这个注解的话有点麻烦,通过后面的Configuration类,Spring也可以扫码到相关的代码。
2.3 增加xml文件
在resources目录下,增加UserMapper.xml文件,具体代码如下:
<?xml version="1.0" encoding="UTF-8" ?>
<!DOCTYPE mapper
        PUBLIC "-//mybatis.org//DTD Mapper 3.0//EN"
        "http://mybatis.org/dtd/mybatis-3-mapper.dtd">
<mapper namespace="cn.net.susan.mapper.user.UserMapper">

    <resultMap type="cn.net.susan.entity.user.UserEntity"
               id="userResult">
        <result property="id" column="id"/>
        <result property="userName" column="user_name"/>
        <result property="createUserId" column="create_user_id"/>
        <result property="createUserName" column="create_user_name"/>
        <result property="createTime" column="create_time"/>
        <result property="updateUserId" column="update_user_id"/>
        <result property="updateUserName" column="update_user_name"/>
        <result property="updateTime" column="update_time"/>
        <result property="isDel" column="is_del"/>
    </resultMap>

    <sql id="paginationSql">
        LIMIT #{pageBegin} , #{pageSize}
    </sql>

    <sql id="selectUserColumn">
          id
         , user_name
         , create_user_id
         , create_user_name
         , create_time
         , update_user_id
         , update_user_name
         , update_time
         , is_del
     </sql>

    <sql id="queryWhere">
        <where>
            <if test="id != null ">
                AND id = #{id}
            </if>
            <if test="userName != null and userName !=''">
                AND user_name = #{userName}
            </if>
            AND is_del = 0
        </where>
    </sql>

    <select id="findById" parameterType="Long"
            resultMap="userResult">
        SELECT
        <include refid="selectUserColumn"/>
        FROM user
        WHERE id = #{id}
    </select>

    <select id="searchByCondition"
            parameterType="cn.net.susan.entity.user.UserConditionEntity"
            resultMap="userResult">
        SELECT
        <include refid="selectUserColumn"/>
        FROM user
        <include refid="queryWhere"/>
        <include refid="paginationSql"/>
    </select>

    <select id="searchCount"
            parameterType="cn.net.susan.entity.user.UserConditionEntity"
            resultType="int">
        SELECT
        COUNT(*)
        FROM user
        <include refid="queryWhere"/>
    </select>


    <update id="update" parameterType="cn.net.susan.entity.user.UserEntity">
        UPDATE user
        <set>
            <if test="userName != null and userName != ''">
                user_name = #{userName,jdbcType=VARCHAR},
            </if>
            <if test="createUserId != null">
                create_user_id = #{createUserId,jdbcType=BIGINT},
            </if>
            <if test="createUserName != null and createUserName != ''">
                create_user_name = #{createUserName,jdbcType=VARCHAR},
            </if>
            <if test="updateUserId != null">
                update_user_id = #{updateUserId,jdbcType=BIGINT},
            </if>
            <if test="updateUserName != null and updateUserName != ''">
                update_user_name = #{updateUserName,jdbcType=VARCHAR},
            </if>
            <if test="isDel != null">
                is_del = #{isDel,jdbcType=INTEGER},
            </if>
            update_time=now(3)
        </set>
        WHERE id = #{id}
    </update>

    <delete id="deleteById">
        UPDATE user
        SET is_del = 1,update_time=now(3)
        WHERE id = #{id}
    </delete>

    <insert id="insert" parameterType="cn.net.susan.entity.user.UserEntity">
        INSERT INTO user
        (
        id
        , user_name
        , create_user_id
        , create_user_name
        , create_time
        , update_user_id
        , update_user_name
        , update_time
        )
        VALUES
            (
            #{id,jdbcType=BIGINT},
            #{userName,jdbcType=VARCHAR},
            #{createUserId,jdbcType=BIGINT},
            #{createUserName,jdbcType=VARCHAR},
            now(3),
            #{updateUserId,jdbcType=BIGINT},
            #{updateUserName,jdbcType=VARCHAR},
            now(3)
            )
    </insert>
</mapper>
它里面定义了UserMapper接口中对应的CURD方法。
后面这个文件也可以通过代码生成工具生成好。
2.4 增加Service类
增加一个UserService类:
@Service
public class UserService {

    @Autowired
    private UserMapper userMapper;

    /**
     * 通过id查询用户信息
     *
     * @param id 系统ID
     * @return 用户信息
     */
    public UserEntity findById(Long id) {
        return userMapper.findById(id);
    }

    /**
     * 根据条件查询用户列表
     *
     * @param userConditionEntity 条件
     * @return 用户列表
     */
    public ResponsePageEntity<UserEntity> searchByPage(UserConditionEntity userConditionEntity) {
        int count = userMapper.searchCount(userConditionEntity);
        if (count == 0) {
            return ResponsePageEntity.buildEmpty(userConditionEntity);
        }
        List<UserEntity> userEntities = userMapper.searchByCondition(userConditionEntity);
        return ResponsePageEntity.build(userConditionEntity, count, userEntities);
    }


    /**
     * 添加用户
     *
     * @param userEntity 用户实体
     * @return 影响行数
     */
    public int insert(UserEntity userEntity) {
        return userMapper.insert(userEntity);
    }

    /**
     * 修改用户
     *
     * @param userEntity 用户实体
     * @return 影响行数
     */
    public int update(UserEntity userEntity) {
        return userMapper.update(userEntity);
    }

    /**
     * 删除用户
     *
     * @param id 用户ID
     * @return 影响行数
     */
    public int deleteById(Long id) {
        return userMapper.deleteById(id);
    }
}
该类加上@Service注解,通过@Autowired注解引入UserMapper对象的bean实例。
调用的其实就是UserMapper接口中对应的方法。
需要注意的是分页接口,做了一点特殊处理。
请求参数是UserConditionEntity对象继承了一个分页请求实体(RequestPageEntity):
@Data
public class UserConditionEntity extends RequestPageEntity {
    /**
     * 系统ID
     */
    private Long id;

    /**
     * 用户名称
     */
    private String userName;

}
RequestPageEntity包含了分页请求的参数:
@AllArgsConstructor
@NoArgsConstructor
@Data
public class RequestPageEntity implements Serializable {

    private static final int DEFAULT_PAGE_SIZE = 10;

    /**
     * 页码,默认从一页开始
     */
    private Integer pageNo = 1;

    /**
     * 每页大小,默认一页查询10条数据
     */
    private Integer pageSize = DEFAULT_PAGE_SIZE;

    /**
     * 获取分页开始位置
     *
     * @return 分页开始位置
     */
    public Integer getPageBegin() {
        if (Objects.isNull(this.pageNo)) {
            this.pageNo = 1;
        }

        if (Objects.isNull(this.pageSize)) {
            this.pageSize = DEFAULT_PAGE_SIZE;
        }

        return (this.pageNo - 1) * this.pageSize;
    }
}
此外,searchByPage方法返回的是ResponsePageEntity类型的数据,该类是分页响应实体。
这个类的代码,后面也可以通过代码生成工具生成好。
2.4 增加Controller类
增加UserController类:
@RestController
@RequestMapping("/user")
public class UserController {

    @Autowired
    private UserService userService;

    /**
     * 通过id查询用户信息
     *
     * @param id 系统ID
     * @return 用户信息
     */
    @GetMapping("/findById")
    public UserEntity findById(Long id) {
        return userService.findById(id);
    }

    /**
     * 根据条件查询用户列表
     *
     * @param userConditionEntity 条件
     * @return 用户列表
     */
    @PostMapping("/searchByPage")
    public ResponsePageEntity<UserEntity> searchByPage(@RequestBody UserConditionEntity userConditionEntity) {
        return userService.searchByPage(userConditionEntity);
    }


    /**
     * 添加用户
     *
     * @param userEntity 用户实体
     * @return 影响行数
     */
    @PostMapping("/insert")
    public int insert(@RequestBody UserEntity userEntity) {
        return userService.insert(userEntity);
    }

    /**
     * 修改用户
     *
     * @param userEntity 用户实体
     * @return 影响行数
     */
    @PostMapping("/update")
    public int update(@RequestBody UserEntity userEntity) {
        return userService.update(userEntity);
    }

    /**
     * 删除用户
     *
     * @param id 用户ID
     * @return 影响行数
     */
    @PostMapping("/deleteById")
    public int deleteById(@RequestBody @NotNull Long id) {
        return userService.deleteById(id);
    }
}
该类的代码放到了mall-mgt下面,是接口层的代码。
UserController类加了@RestController注解和@RequestMapping注解。
@RestController注解声明了这个类使用了@Controller注解,并且使用了@ResponseBody注解。
而@RequestMapping注解表示该接口请求的路径前缀。
然后在具体的接口方法中,通过@PostMapping和@GetMapping注解设置请求的具体路径。
用户请求的url = http://localhost:端口号/路径前缀/具体路径。
例如:http://localhost:8011/user/findById?id=1
2.5 增加Configuration类
还需要增加一个Configuration类,即:ApplicationConfig,它主要用于在应用启动时,加载一下配置。
代码如下:
@MapperScan(basePackages = "cn.net.susan.mapper")
@Configuration
public class ApplicationConfig {
}
2.6 测试
使用postman调用添加用户接口,接口地址:http://localhost:8011/user/insert,传入json格式的参数,请求方式是post: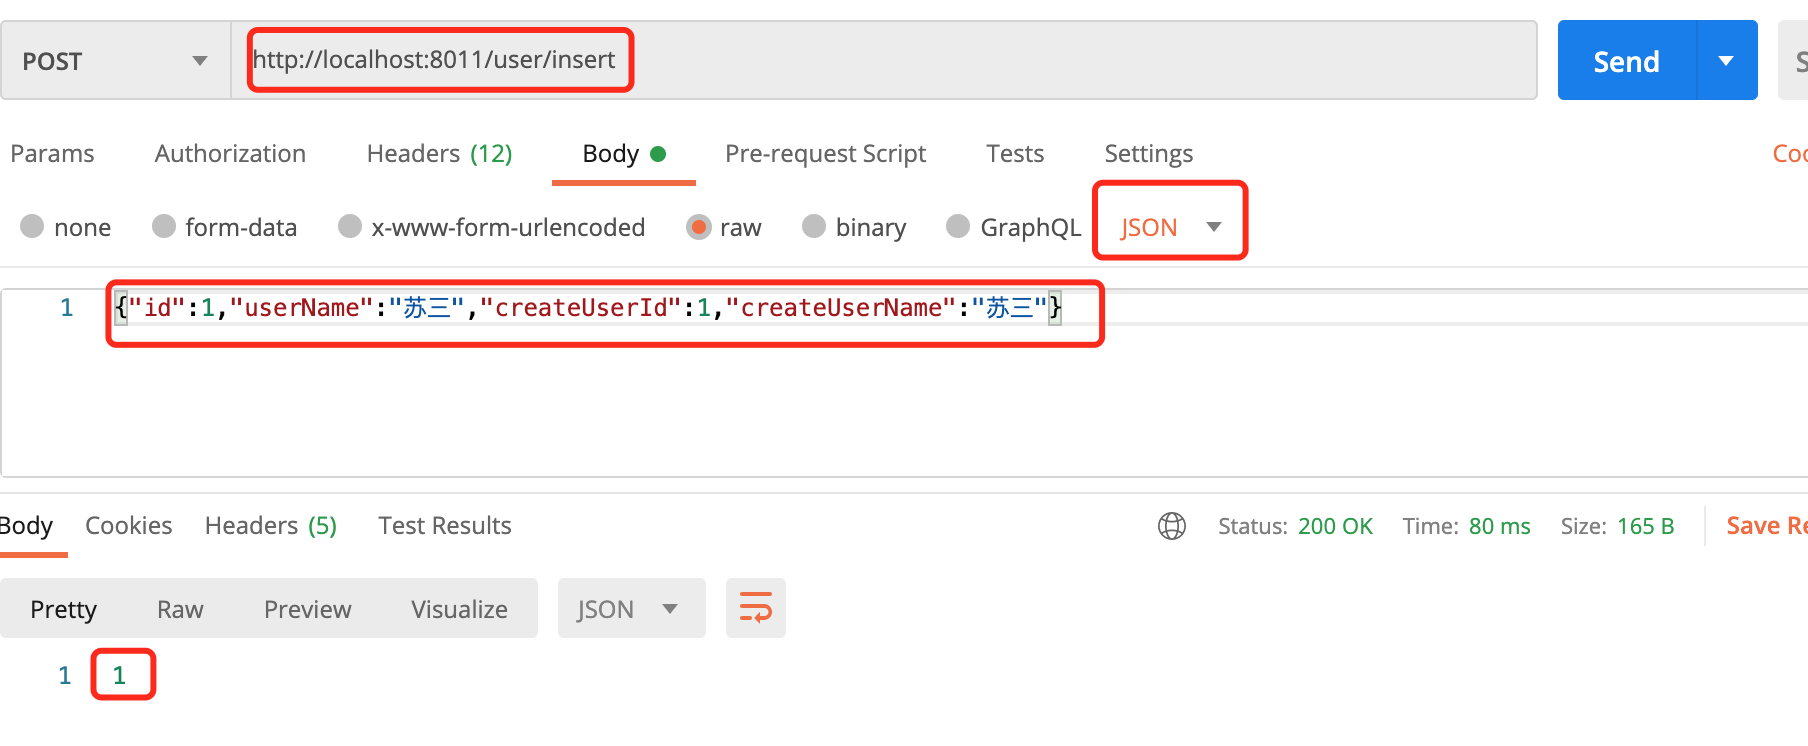
调用成功了,返回的影响行数是1。
查询数据库,已经有一条数据了。
再用postman调用查询用户接口,接口地址:http://localhost:8011/user/findById?id=1,请求方式是get,传入参数id=1: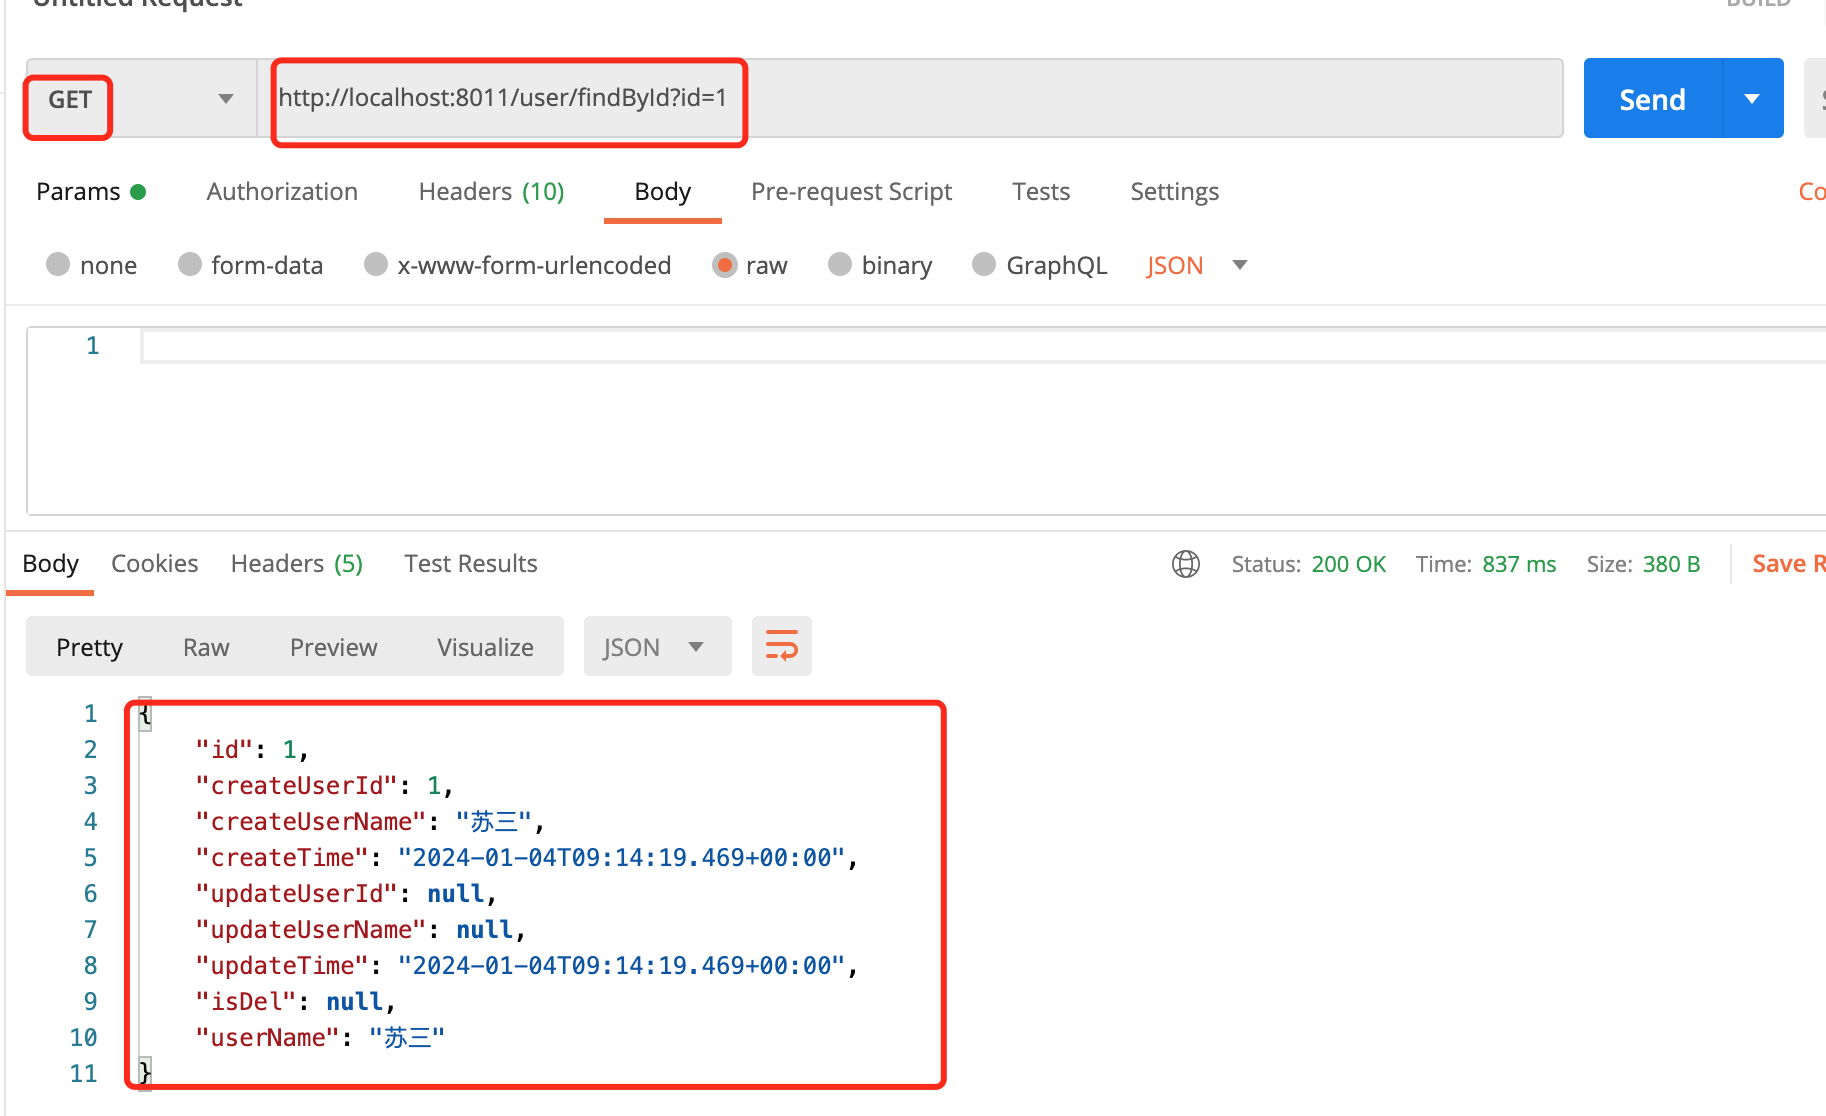
返回了一条数据。
再测试一下分页用户查询接口,接口地址:http://localhost:8011/user/searchByPage,传入json格式的分页参数,请求方式是post: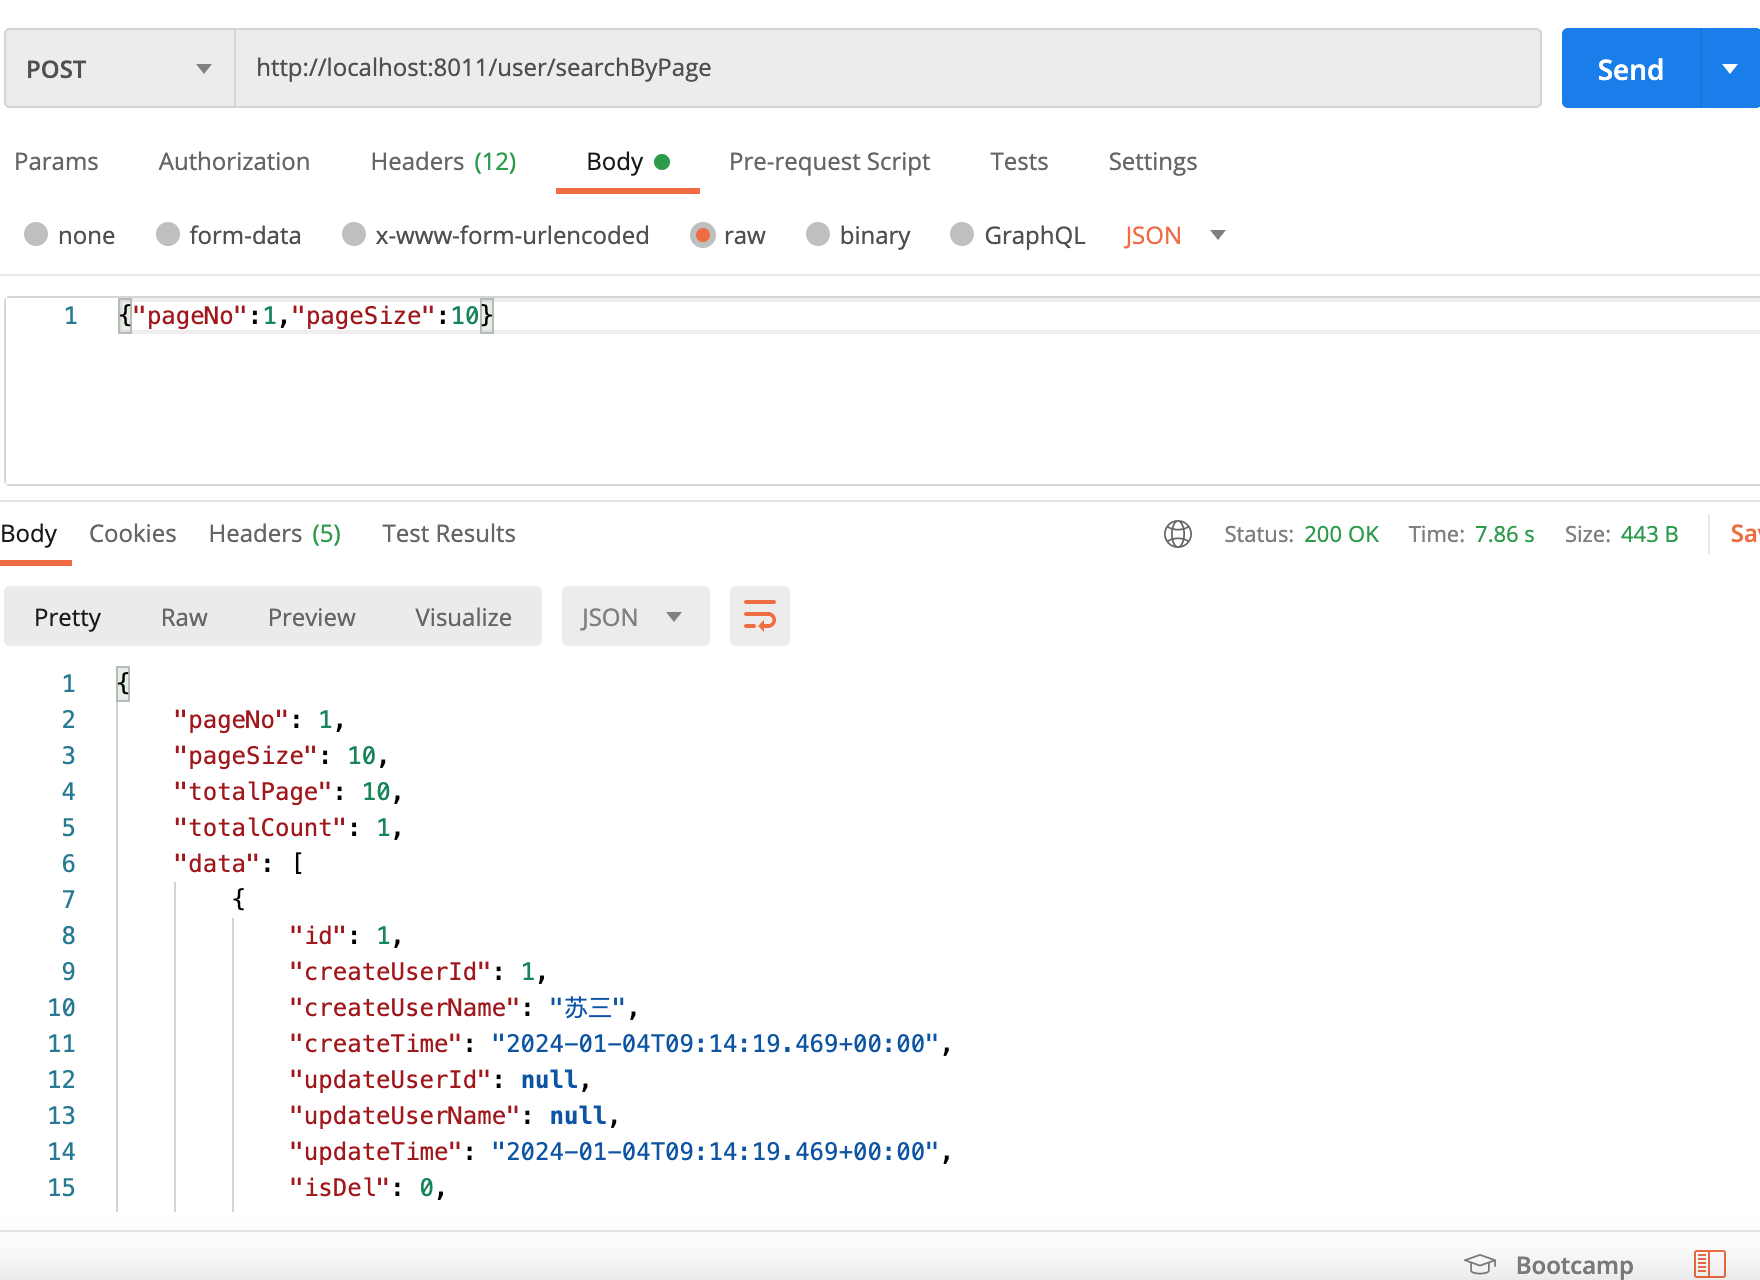
调用成功了,返回了一个list。
在测试一下修改用户接口,接口地址:http://localhost:8011/user/update,传入json格式的请求参数,请求方式是post: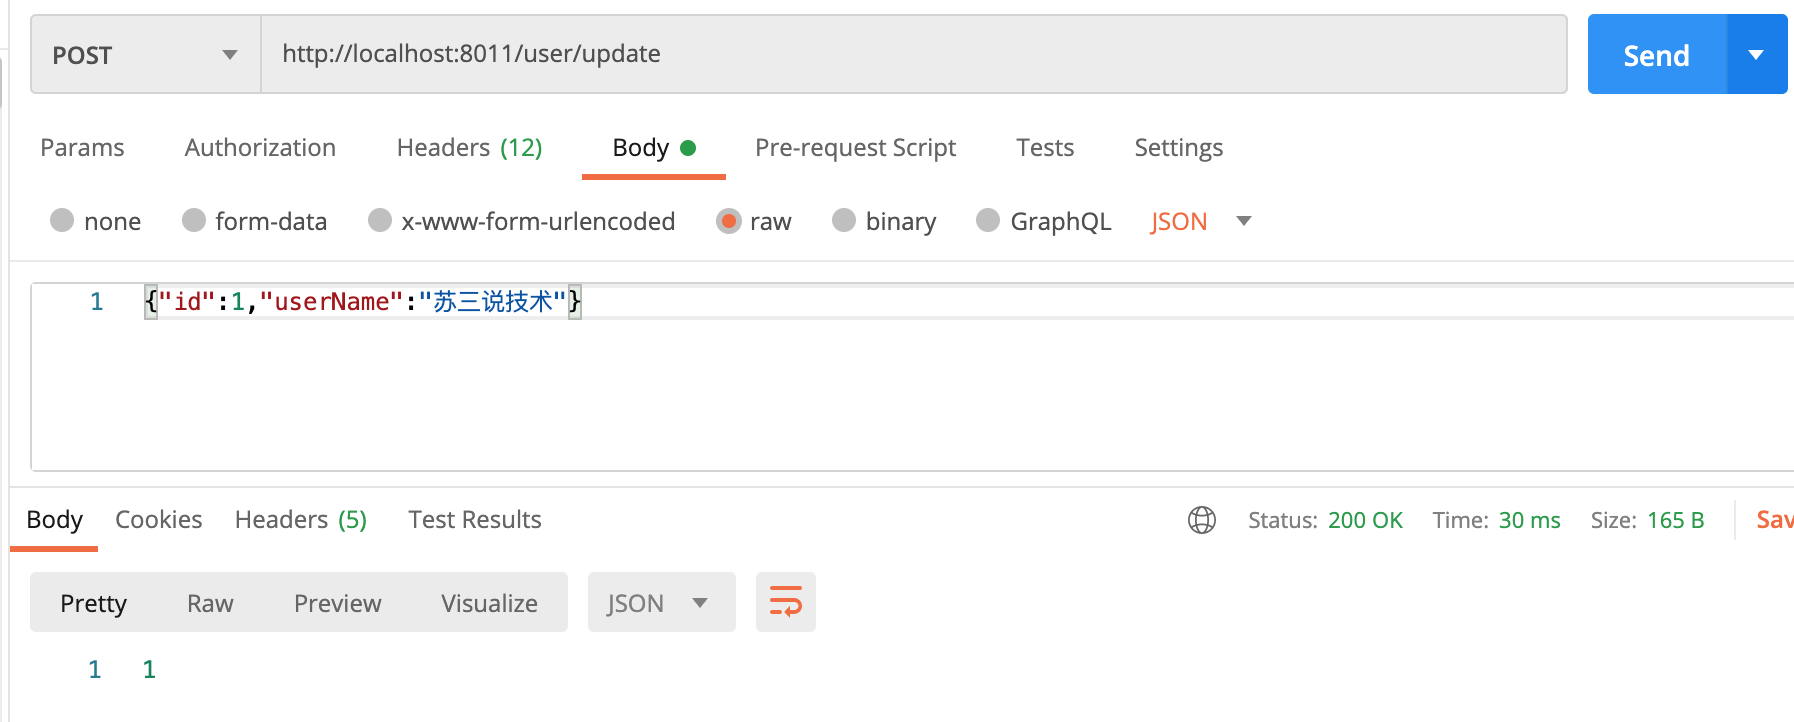
调用成功了,返回的影响行数是1。
查询数据库,userName已经变成了:苏三说技术。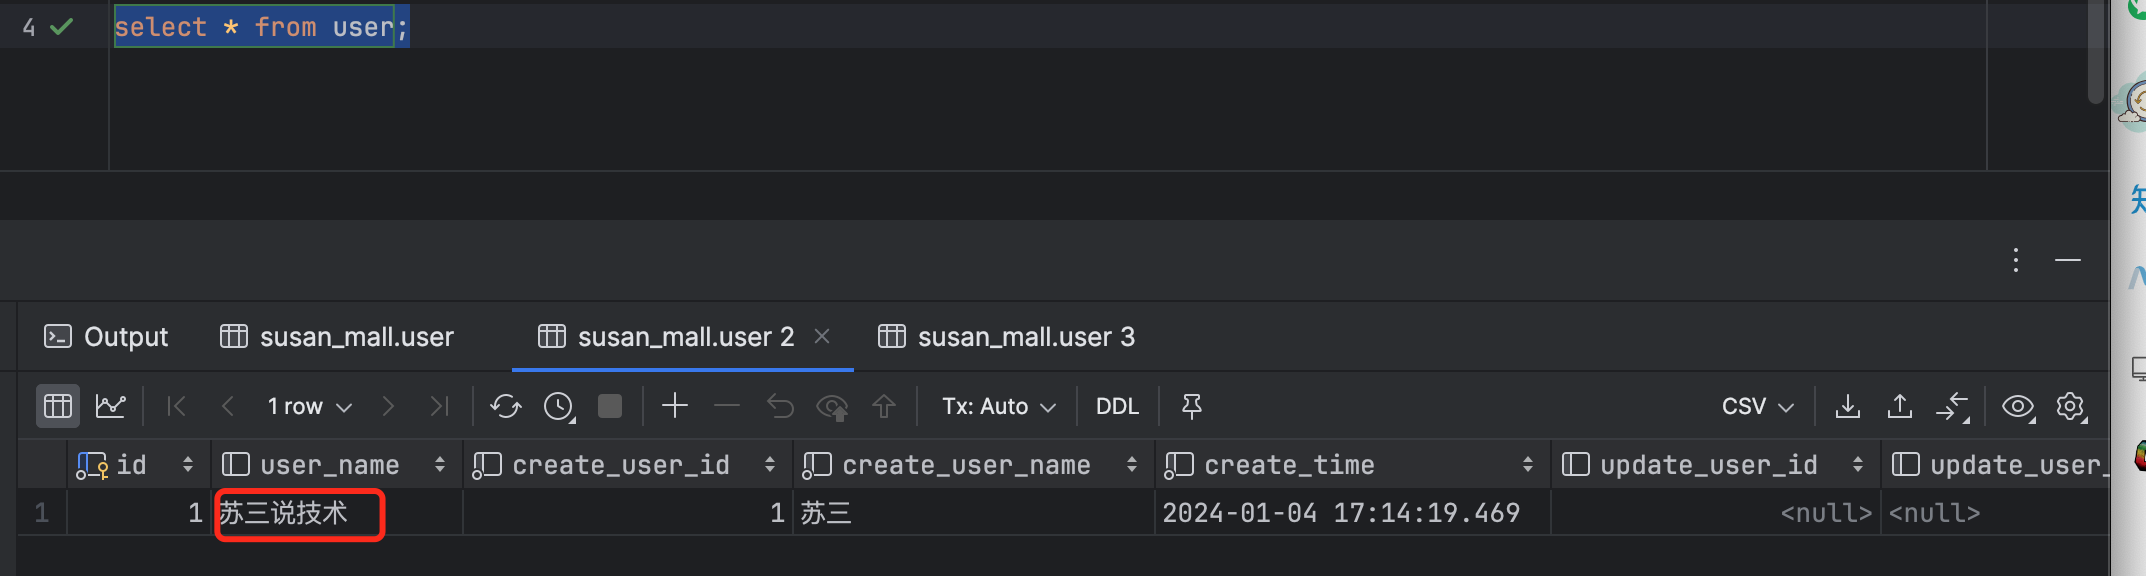
最后测试一下删除用户接口,接口地址:http://localhost:8011/user/deleteById,传入1,请求方式是post: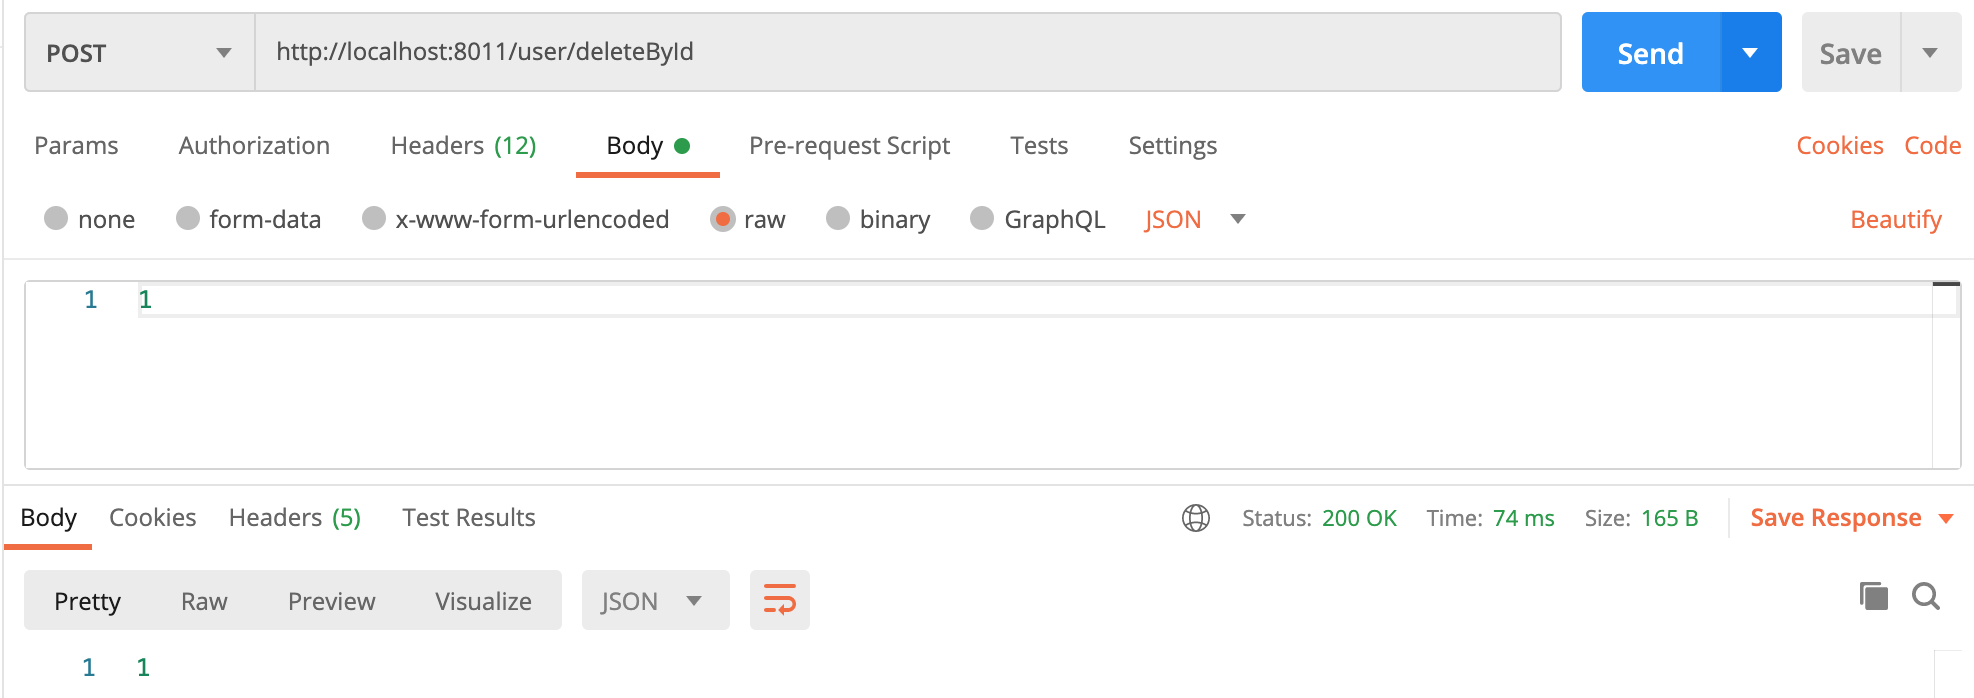
调用成功了,返回的影响行数是1。
再次查询数据库,is_del字段的值变成了:1,说明该数据已被删除,默认是0,表示未删除。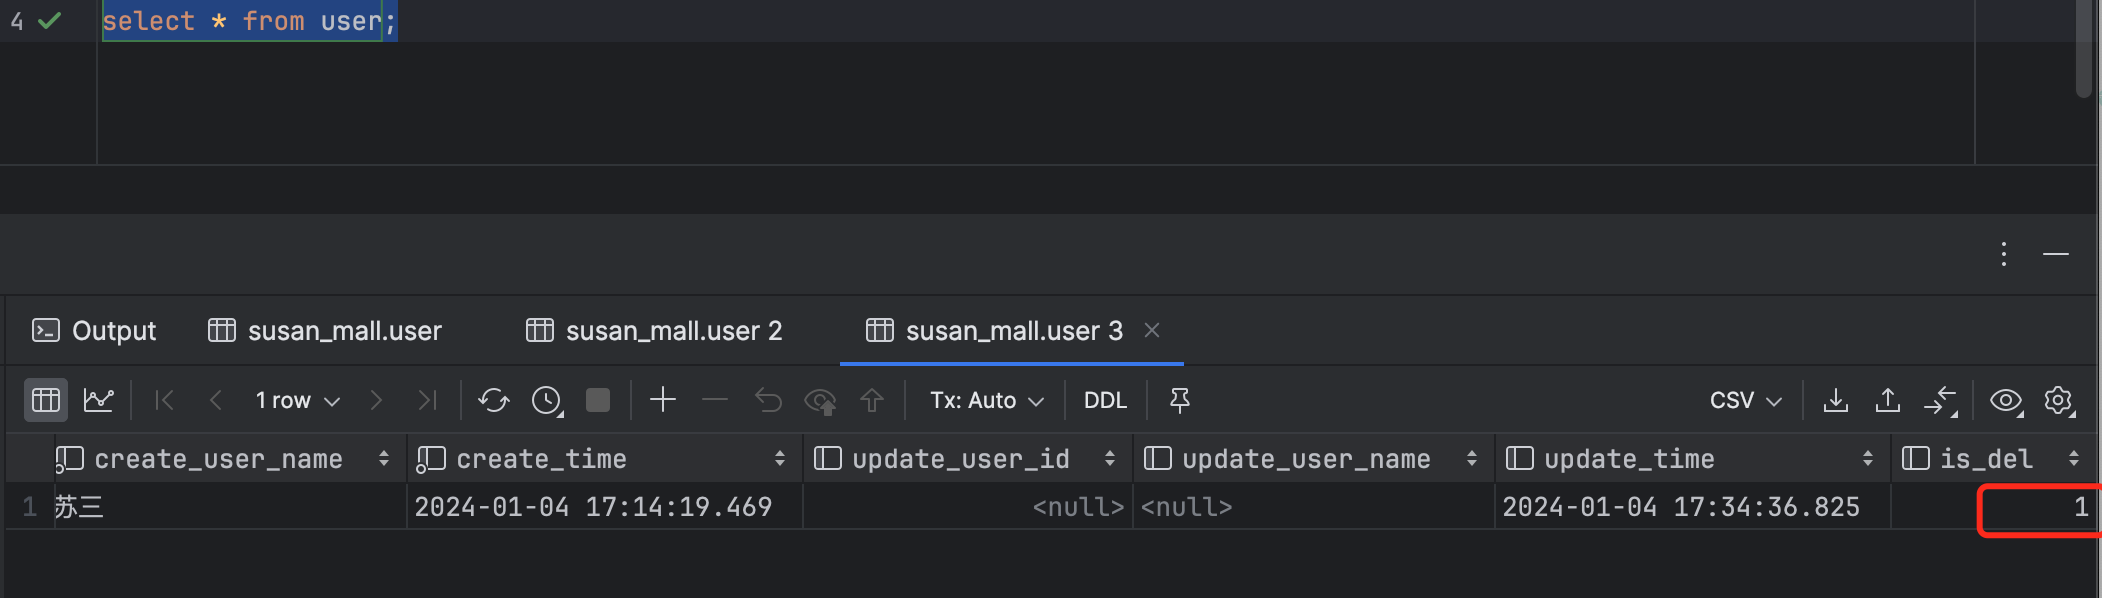
好了,到这来,用户表的一个基本的CURD功能完成了。