Spring Boot 4.0 自动配置原理:从条件装配到自定义 Starter
前言
很多项目会把日志、鉴权、统一客户端或内部基础能力复制到每个服务。代码能用,但升级时要逐个仓库修改,配置项也容易不一致。
自定义 Starter 用来解决这类重复接入问题:把默认实现、配置属性和条件判断放在一个独立模块里,使用方只添加依赖。
这篇教程会为现有项目增加 demo-greeting-starter。完成后,你既能通过配置修改问候语,也能在某次启动时关闭整个自动配置。
配套源码:dvsusan/spring-boot4-demo。上一篇已经完成多模块工程,本篇直接在此基础上增加第四个业务模块。
最终结果
新增模块在工程中的位置:
spring-boot4-demo/
├── demo-common/
├── demo-order/
├── demo-greeting-starter/
│   ├── pom.xml
│   └── src/main/
│       ├── java/com/susan/starter/greeting/
│       │   ├── GreetingAutoConfiguration.java
│       │   ├── GreetingProperties.java
│       │   └── GreetingService.java
│       └── resources/META-INF/spring/
│           └── org.springframework.boot.autoconfigure.AutoConfiguration.imports
└── demo-web/
Starter 使用 com.susan.starter.greeting,故意不放在应用启动类所在的 com.susan.training 包下。这样它不会被普通组件扫描“顺手”加载,读者可以清楚看到 AutoConfiguration.imports 的作用。
依赖变化如下:
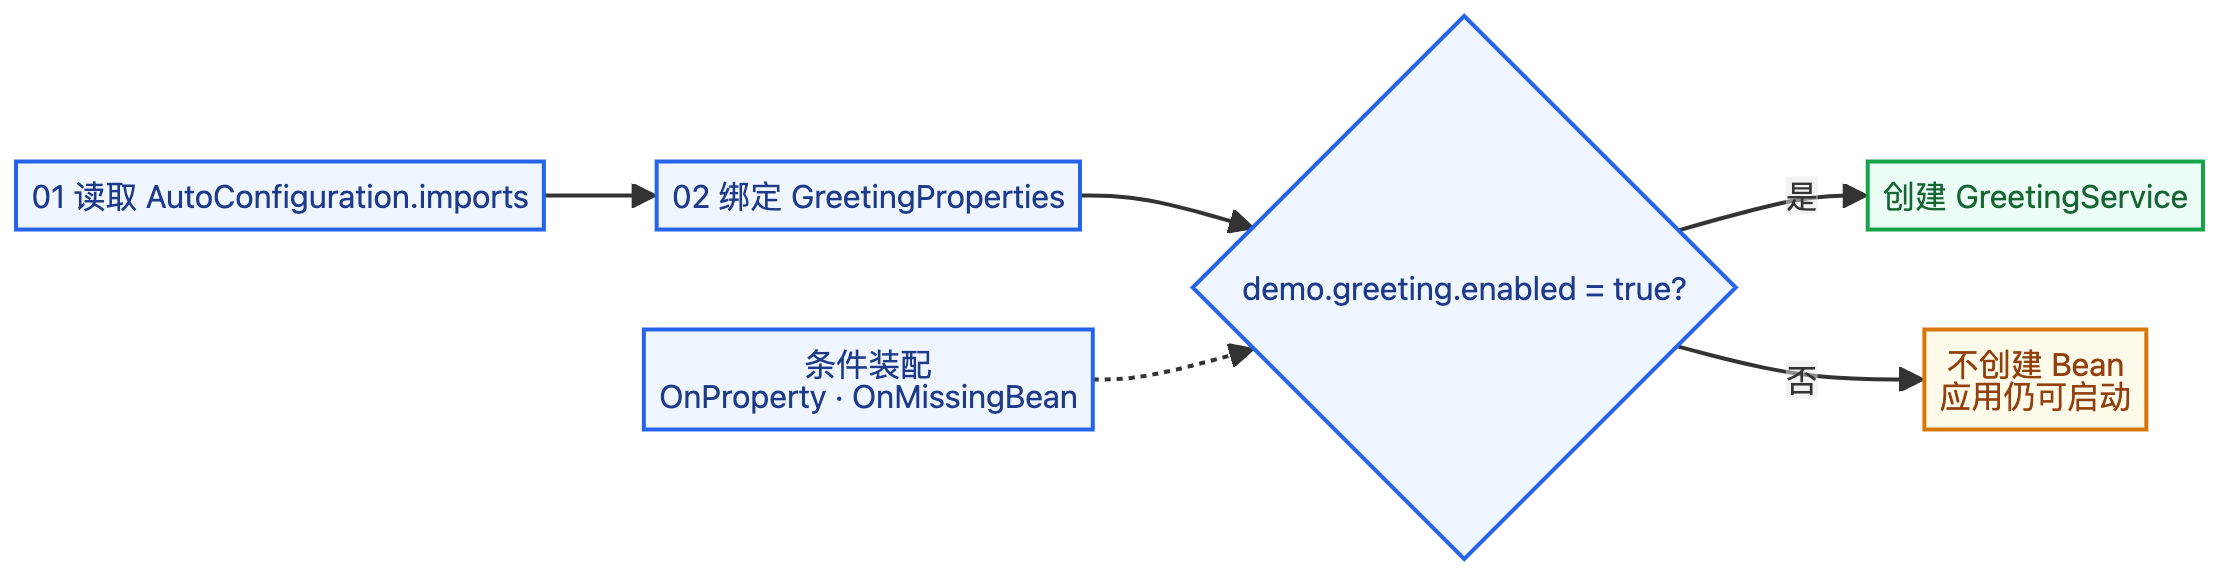
图 1:Starter 先被 imports 发现,再根据条件决定是否创建默认 Bean。
Web 模块引入 Starter 后,不写 @Bean 也能得到 GreetingService。当 demo.greeting.enabled=false 时,自动配置不会创建这个 Bean。
自动配置不是普通的包扫描
@Component 依赖启动类的包扫描范围。自动配置则由 Spring Boot 在启动时读取注册文件,再根据条件决定是否装配。
自定义 Starter 需要同时具备三部分:
- 可被调用的业务类。
- 一组以固定前缀开头的配置属性。
- 能让 Spring Boot 找到自动配置类的注册文件。
少了注册文件,类虽然编译成功,容器却不会加载它。这是自定义 Starter 最常见的错误之一。
第 1 步:注册新模块
编辑根目录 pom.xml,把新模块放到公共模块之后、业务模块之前:
<modules>
    <!-- 自动配置模块放在公共能力与业务模块之间。 -->
    <module>demo-common</module>
    <module>demo-greeting-starter</module>
    <module>demo-order</module>
    <module>demo-web</module>
</modules>
Maven 会根据依赖关系构建,但把模块按“公共能力、自动配置、业务、Web”排列,阅读者一眼就能理解项目结构。
第 2 步:创建 Starter 的 POM
创建 demo-greeting-starter/pom.xml:
<?xml version="1.0" encoding="UTF-8"?>
<project xmlns="http://maven.apache.org/POM/4.0.0"
         xmlns:xsi="http://www.w3.org/2001/XMLSchema-instance"
         xsi:schemaLocation="http://maven.apache.org/POM/4.0.0 https://maven.apache.org/xsd/maven-4.0.0.xsd">
    <modelVersion>4.0.0</modelVersion>

    <parent>
        <groupId>com.susan.training</groupId>
        <artifactId>demo-platform</artifactId>
        <version>1.0.0-SNAPSHOT</version>
        <relativePath>../pom.xml</relativePath>
    </parent>

    <artifactId>demo-greeting-starter</artifactId>

    <dependencies>
        <!-- 自动配置类和条件注解都来自 Spring Boot 的自动配置模块。 -->
        <dependency>
            <groupId>org.springframework.boot</groupId>
            <artifactId>spring-boot-autoconfigure</artifactId>
        </dependency>
    </dependencies>
</project>
这里没有引入 Web Starter。Starter 应保持职责单一,使用方是否需要 Web 由它自己决定。
正式发布时还可以增加可选的 spring-boot-configuration-processor,让 IDE 为配置属性生成提示。它不改变运行逻辑,因此本示例保持最小依赖。
第 3 步:定义配置属性
创建 GreetingProperties.java:
package com.susan.starter.greeting;

import org.springframework.boot.context.properties.ConfigurationProperties;

/**
 * 自定义 Starter 的可配置项。
 *
 * <p>属性前缀是 demo.greeting,使用方只需在 application.yml 中配置即可,
 * 不需要修改 Starter 内部代码。</p>
 */
@ConfigurationProperties(prefix = "demo.greeting")
public class GreetingProperties {
    // 默认开启,方便引入 Starter 后立即看到效果。
    private boolean enabled = true;

    // %s 是调用方传入的名字,由 GreetingService 负责格式化。
    private String message = "你好,%s";

    public boolean isEnabled() {
        return enabled;
    }

    public void setEnabled(boolean enabled) {
        this.enabled = enabled;
    }

    public String getMessage() {
        return message;
    }

    public void setMessage(String message) {
        this.message = message;
    }
}
@ConfigurationProperties 把 demo.greeting.message 绑定到 getMessage/setMessage。max-page-size 这类短横线命名会自动映射到 maxPageSize。
配置类有默认值,所以使用方只引入 Starter、什么都不配置,也能正常工作。
第 4 步:提供默认服务
创建 GreetingService.java:
package com.susan.starter.greeting;

/**
 * 自定义 Starter 暴露给业务使用的服务。
 */
public class GreetingService {
    private final GreetingProperties properties;

    public GreetingService(GreetingProperties properties) {
        this.properties = properties;
    }

    /**
     * 根据配置模板生成问候语。
     */
    public String greet(String name) {
        return properties.getMessage().formatted(name);
    }
}这里仍然使用构造器注入属性对象。GreetingService 本身没有 @Service,它是否进入容器由下一步的自动配置决定。
这种写法让同一个服务更容易单独测试,也避免“依赖一旦引入就无法关闭”。
第 5 步:编写自动配置类
创建 GreetingAutoConfiguration.java:
package com.susan.starter.greeting;

import org.springframework.boot.autoconfigure.AutoConfiguration;
import org.springframework.boot.autoconfigure.condition.ConditionalOnMissingBean;
import org.springframework.boot.autoconfigure.condition.ConditionalOnProperty;
import org.springframework.boot.context.properties.EnableConfigurationProperties;
import org.springframework.context.annotation.Bean;

/**
 * 自定义问候 Starter 的自动配置入口。
 *
 * <p>@AutoConfiguration 表示该类由 Spring Boot 的自动配置机制加载。
 * 条件注解让使用方可以通过配置关闭 Starter,也可以自己提供
 * GreetingService 覆盖默认实现。</p>
 */
@AutoConfiguration
@EnableConfigurationProperties(GreetingProperties.class)
@ConditionalOnProperty(
        prefix = "demo.greeting",
        name = "enabled",
        havingValue = "true",
        matchIfMissing = true
)
public class GreetingAutoConfiguration {

    /**
     * 只有在容器里还没有 GreetingService 时才创建默认实例。
     */
    @Bean
    @ConditionalOnMissingBean
    public GreetingService greetingService(GreetingProperties properties) {
        return new GreetingService(properties);
    }
}
三个条件需要分开理解:
@AutoConfiguration声明这是 Boot 管理的自动配置类。@ConditionalOnProperty允许使用方通过demo.greeting.enabled开关默认实现。@ConditionalOnMissingBean允许使用方自己提供一个GreetingService,覆盖 Starter 的默认实现。
matchIfMissing=true 表示配置项没有出现时也视为开启。这样默认体验是“加依赖就有服务”。
第 6 步:告诉 Spring Boot 加载哪个类
创建文件:
demo-greeting-starter/src/main/resources/META-INF/spring/
org.springframework.boot.autoconfigure.AutoConfiguration.imports
文件内容只有一行:
com.susan.starter.greeting.GreetingAutoConfiguration文件名看似很长,但它是 Spring Boot 4 约定的固定名称。不要随意简化,也不要继续使用旧版 spring.factories 注册自动配置。
如果这个文件缺失、路径错一层或类名拼错,应用仍然可以启动,只是 GreetingService Bean 不存在。看到“接口返回关闭”时,先检查这里。
第 7 步:让 Web 模块引入 Starter
编辑 demo-web/pom.xml:
<dependency>
    <!-- 使用方只需要引入 Starter,不需要手动导入自动配置类。 -->
    <groupId>com.susan.training</groupId>
    <artifactId>demo-greeting-starter</artifactId>
    <version>${project.version}</version>
</dependency>
Spring Boot 会自动加载模块 JAR 中注册的配置类。Web 模块不需要再写 @Import(GreetingAutoConfiguration.class)。
现在项目中的问候接口使用 ObjectProvider<GreetingService>。这样当自动配置关闭、Bean 不存在时,整个应用仍然能够启动,接口会返回明确的业务提示。
// Starter 可以被关闭,因此该依赖按可选 Bean 获取。
GreetingService greetingService = greetingServiceProvider.getIfAvailable();
if (greetingService == null) {
    return ApiResponse.failure("GREETING_DISABLED", "自定义 Starter 已关闭");
}
return ApiResponse.success(greetingService.greet(name));
第 8 步:配置问候语
在 application-dev.yml 中加入:
demo:
  greeting:
    # 覆盖 Starter 的默认问候模板。
    message: "开发环境你好,%s"
从项目根目录重新打包:
mvn clean package -DskipTests启动:
java -jar demo-web/target/demo-web-1.0.0-SNAPSHOT.jar --server.port=18084请求:
curl "http://localhost:18084/api/v1/system/greeting?name=小明"预期:
{
  "code": "0",
  "message": "success",
  "data": "开发环境你好,小明"
}
如果中文出现在 URL 中,浏览器通常会自动编码。命令行也可以使用 URL 编码后的值。
第 9 步:关闭自动配置
停止服务后重新启动:
java -jar demo-web/target/demo-web-1.0.0-SNAPSHOT.jar \
  --server.port=18084 \
  --demo.greeting.enabled=false
再次请求同一个接口:
curl "http://localhost:18084/api/v1/system/greeting?name=小明"预期业务码:
{
  "code": "GREETING_DISABLED",
  "message": "自定义 Starter 已关闭"
}
这次应用仍然启动成功,只少了条件不满足的 Bean。这说明自动配置可以从功能链路上移除,而不是把整个服务拖垮。
常见问题排查
| 现象 | 原因 | 处理方式 |
|---|---|---|
引入依赖后仍无 GreetingService | imports 文件缺失或类名错误 | 检查固定路径和完整包名 |
enabled=true 仍然关闭 | 命令行或环境变量覆盖了 YAML | 检查配置优先级和启动参数 |
| 自己定义的 Bean 没有覆盖默认值 | 条件类加载顺序或定义位置不合适 | 检查同名 Bean 和自动配置顺序 |
| 关闭 Starter 后整个应用启动失败 | 业务类强依赖可选 Bean | 使用 ObjectProvider 或单独条件配置 |
| IDE 没有属性提示 | 未引入 configuration processor | 发布模块时按需开启元数据生成 |
练习题
给问候服务增加 demo.greeting.prefix 配置,最终输出变成:
[ORDER] 开发环境你好,小明验收标准:
- 配置默认值有效。
- 不修改 Controller 就能改变输出前缀。
enabled=false时仍能正常关闭。- 增加一条注释解释新增属性的边界。
总结
自定义 Starter 的关键不是把 @Configuration 换成 @AutoConfiguration,而是把配置、默认实现、条件判断和注册文件组成一个可预测的装配单元。
下一篇会进一步拆开 application.yml、开发 Profile、生产 Profile 和外部参数,理解配置到底从哪里来、谁覆盖谁。
上一节:从零搭建多模块项目
下一节:Spring Boot 4.0 配置管理
13 个企业级实战项目 · 源码 + 教程 + 答疑
简历包装指导AI Agent 实战高并发·微服务Offer 导向持续更新3000+ 同行交流1V1 答疑3 天包退
覆盖高并发、微服务、分布式与 AI Agent:100万QPS短链、企业智能知识库、商城微服务、SaaS点餐、秒杀、刷题小程序、代码生成器、AI Agent 等。券后 ¥129(原价 ¥159),不满意 3 天包退。